Sell Like a Warrior!
Selling your first infoproduct can seem like a daunting endeavor. Most beginners usually find it easy to create the product – but struggle with the tech setup.
They’ve no idea how to:
- Process payments
- Build a funnel
- Add buyers to an email list
- Recruit and pay affiliates
- And on and on it goes…
The good news is that using a marketplace (platform) like WarriorPlus will simplify the entire process for you.
But even here, newbies feel intimidated because of the learning curve. After all, you don’t know what you don’t know – and this leads to a form of ‘paralysis’ that prevents them from using WarriorPlus.
In this guide, you’ll be shown step-by-step how you can set up and sell your
infoproducts on WarriorPlus. We’ll cover all the basics from creating an offer to building a list… to accepting affiliates and much more.
All you need to do is follow the steps below to the letter, and you’ll be fine.
You’ll discover that it’s simple and straightforward once you’re familiar with the process. The learning curve is gentle… ahem… now that you have this guide.
So take action and remember, you only need to do this once for you to become proficient at it.
From there, you can launch all the infoproducts you want, and the sky’s the limit.
Let’s begin!
Part 1: Setting Up Your Product
Step #1 – This is what you’ll need:
- An account with WarriorPlus (it’s free): Sign up here
- A PayPal and/or Stripe account: Sign up for them up here – PayPal | Stripe
- An email marketing tool such as Aweber, ConvertKit, etc.
Do note: Your email marketing tool must integrate with WarriorPlus.
These are the email marketing services accepted by WarriorPlus:
-
- AWeber
- Active Campaign
- CampaignRefinery
- Constant Contact
- ConvertKit
- Custom POST
- Demio
- Drip
- GetResponse v3
- GoToWebinar
- HighLevel
- Hyros
- InfusionSoft
- MailChimp
- Mailvio
- MarketHero
- SendLane
- Sendiio
- Slack
- Zapier
- arpReach
You’ll need an email marketing tool that integrates with WarriorPlus for you to automatically add customers to an email list.
Moving on…
Step #2 – Get these details ready
- Your product image (size: 125 x125 px)
- The URL(s) to your product sales page/s
- The URL to your download page (or file)
- Your JV page (if you have one)
Before proceeding, it’s imperative that you have these details ready. This will speed up the entire process without you having to scramble back and forth.
While graphic design and page creation is beyond the scope of this report, here are a few pointers:
If you wish to get an ecover done for your product, Fiverr is the place to go.
If you wish to create an ecover yourself, you can use eCover Authority.
For your sales pages, there are tons of page builders out there such as OptimizePress, Elementor, etc.
You can’t go wrong with OptimizePress. It’s one of the best out there.
Create your sales pages (and download page, if you’re using one) with a page builder that you’re proficient with.
To protect your download page, you may use a tool like Product Dyno. This tool is optional, but it will protect your page from enthusiastic thieves.
Step #3 – Setting Up Payments & Integrations in WarriorPlus
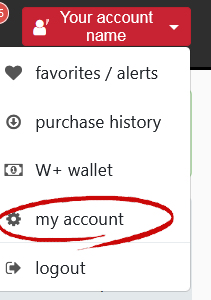
Once you log into W+, this is what you’ll see:

Click on the red button (with your account name) on the upper right side of your screen and click on ‘my account.’

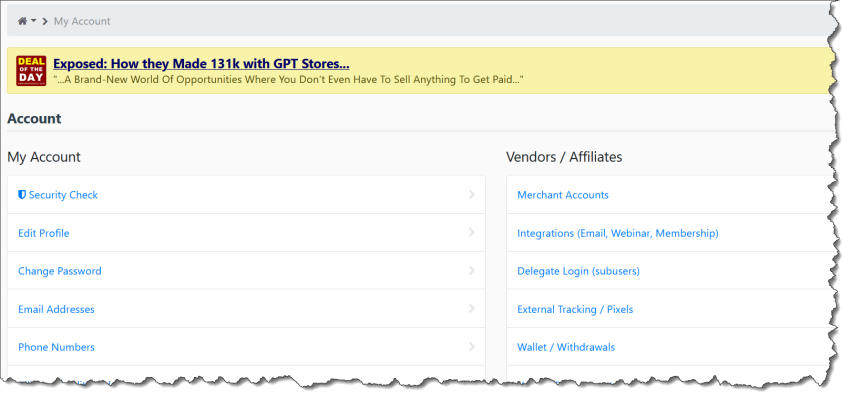
You’ll see this page. Click on ‘Merchant Accounts.’
This is where we will set up the payment processors. Hover on the green ‘New Account’ tab and you’ll see this…

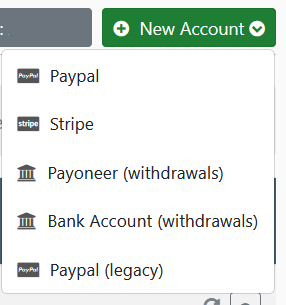
Set up your PayPal (and Stripe, if you’re using it) here. Once you’re done, go back to the ‘My Account’ page.
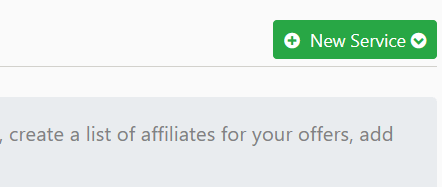
Now we’ll need to integrate WarriorPlus with our email marketing software… Click on ‘Integrations’

Click on the green ‘New service’ button and you’ll see a dropdown list of all the email marketing services that integrate with WarriorPlus.
Choose your service and follow the guided steps after that to integrate your autoresponder.
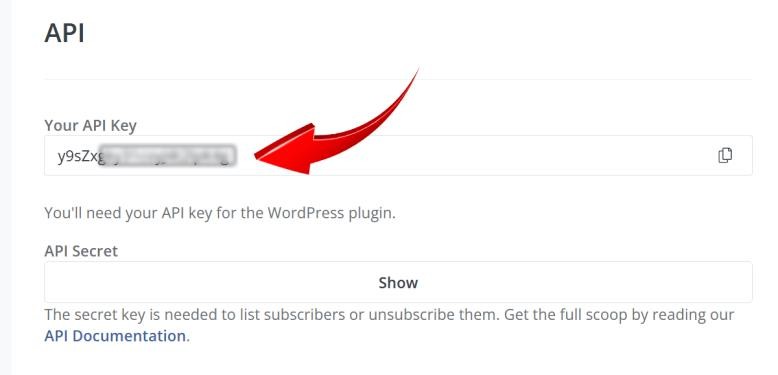
You’ll need to log into your email marketing software to get your API key, which is often found in the account settings. Copy and paste that API key into WarriorPlus and save it.
For this example, we’ll use ConvertKit as our email marketing tool, and this is what the API key will look like…
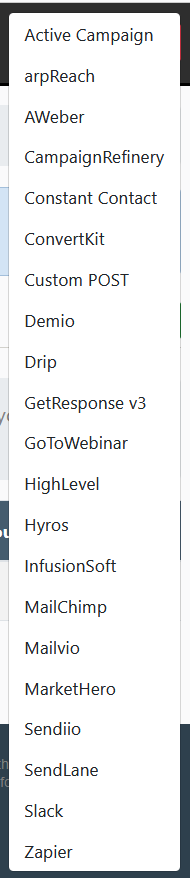
Integrations available in WarriorPlus
Once that’s done, give yourself a pat on the shoulder for a job well done.
You didn’t really do much… but you need all the motivation you can get. It’s time for the heavy lifting!
Step #4 – Create Your Product Listing in WarriorPlus
Time for the fun part…
It doesn’t matter if you are selling a single product or multiple products in a funnel. Every product needs a separate listing in WarriorPlus (W+).
Once you log into W+, this is what you’ll see. Hover over the ‘Vendor’ tab, and you’ll see a dropdown list. Click on ‘Products’
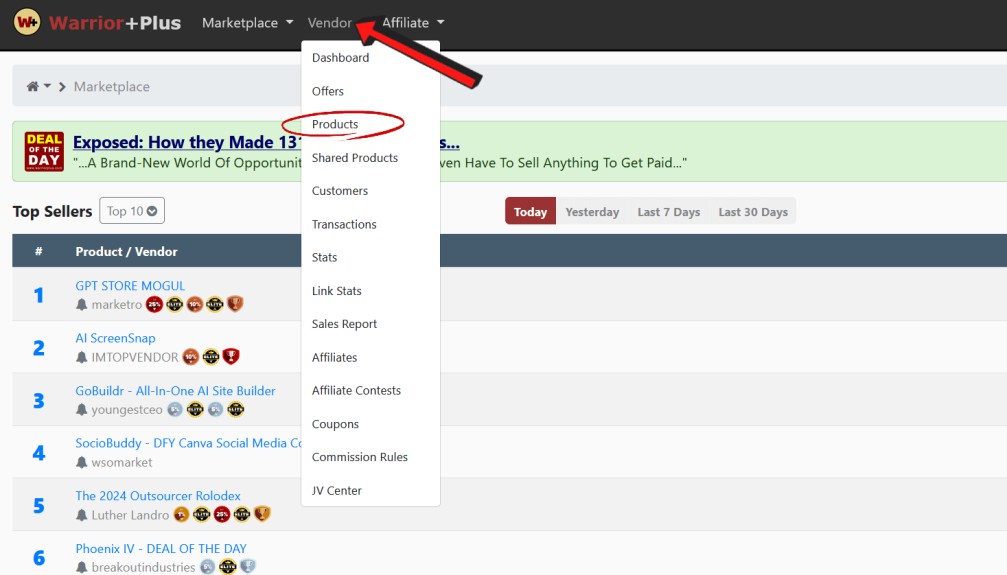
From here, click on the ‘New Product’ green button.

- Add your product name, upload the product image (125 x 125 px).
- There are several categories such as: affiliate marketing, copywriting, email marketing, etc. Choose 1-3 categories that your product may fall into.
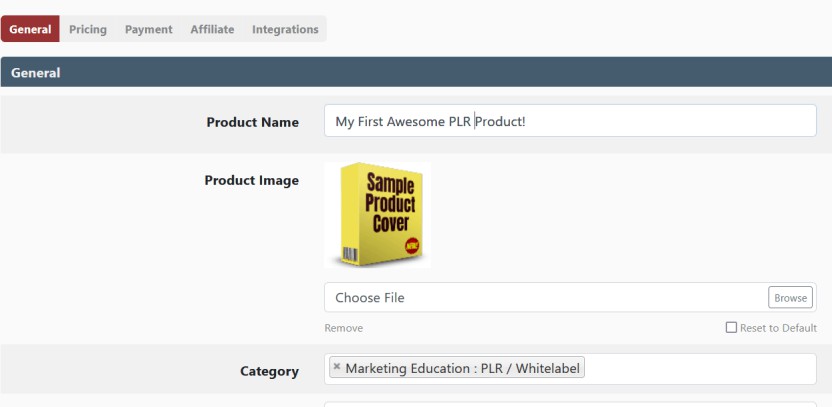
- Choose a few keywords related to your product.
One interesting point to note: If you went to the ‘Marketplace alerts’ page here: https://warriorplus.com/marketplace/alerts …
You’ll see the most popular keywords that buyers are following.
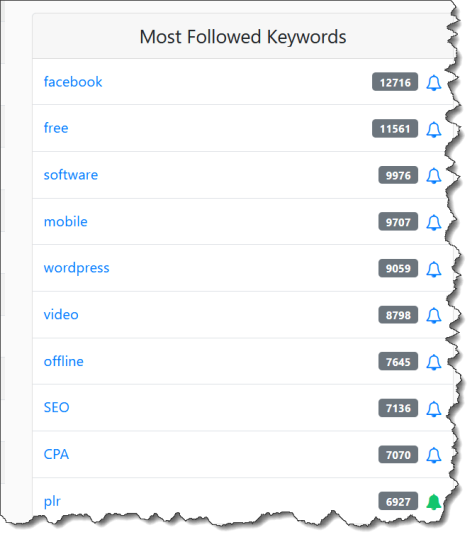
If you use these keywords, they’ll receive an alert when you launch your product. Choose one that’s closely related to your product and add it to your keywords.
Don’t overdo it.
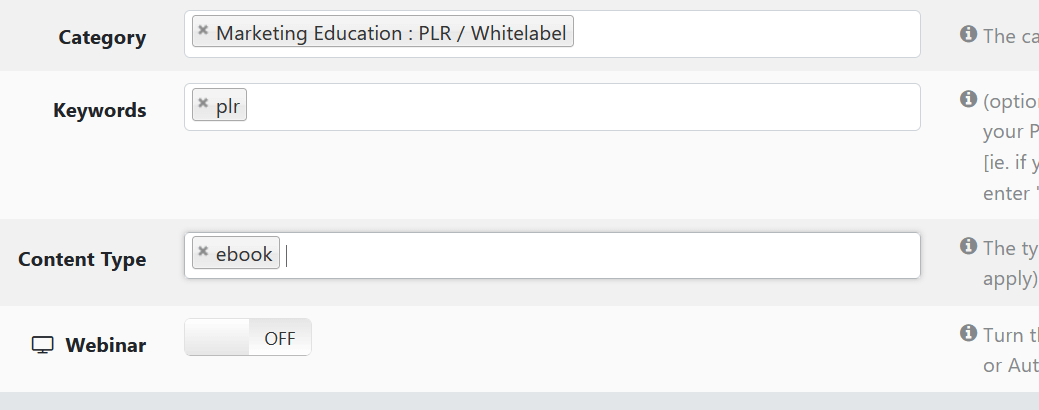
- Choose the content type that suits your product.
We’ve chosen ‘eBook’ but yours may be a video or software, etc. Choose the right one.
Product Access
There are a few points to note here:
If you’re NOT using a product download page, you’ll only need to upload the file to WarriorPlus, but your file size must be 100 MB or less.
You’ll only be allowed to upload 1 zip file. So you’ll have to put all your downloads into one file, zip it up, and upload it.
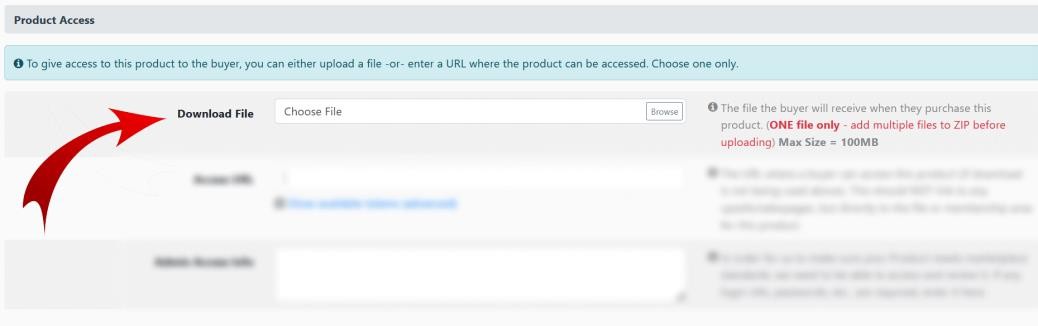
If you’re using a product download page, you’ll add your URL in the field shown in the image below.
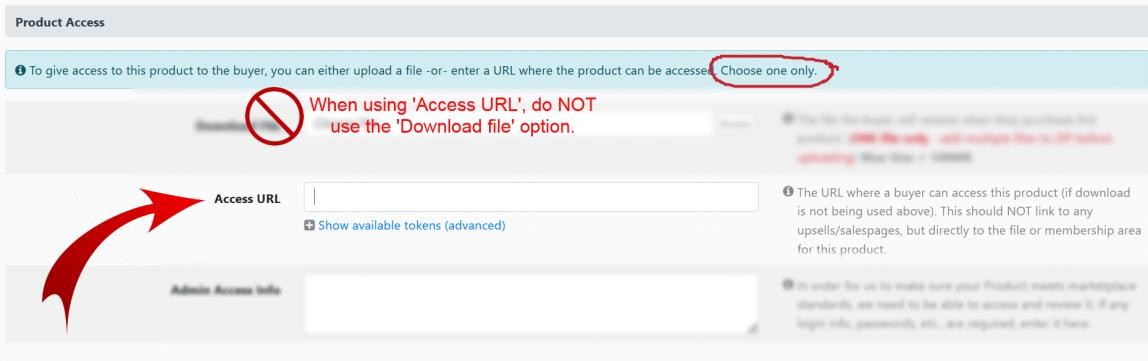
You WILL NOT use the download file field if you’re using the ‘Access URL’ option. Only choose ONE way to deliver your product.
If you’re not using a download page, but you’ve uploaded your file to a platform like Amazon S3 or Dropbox, you’ll add your file URL in the field.
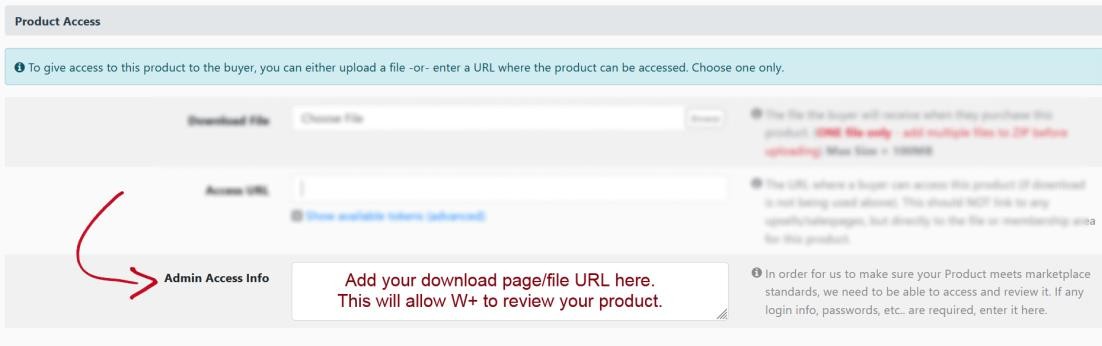
Finally, you’ll need to add your download page/file URL in the field shown below.
This will allow their compliance team access to your product to see if it can be shown in the marketplace and your product might even get picked for Deal of the Day.
Licensing
Under licensing, you can choose if the buyer gets personal use…
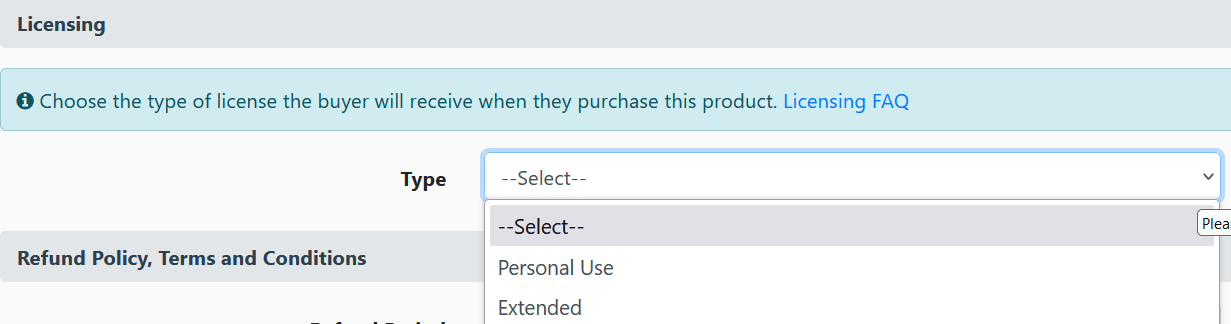
Or extended use…
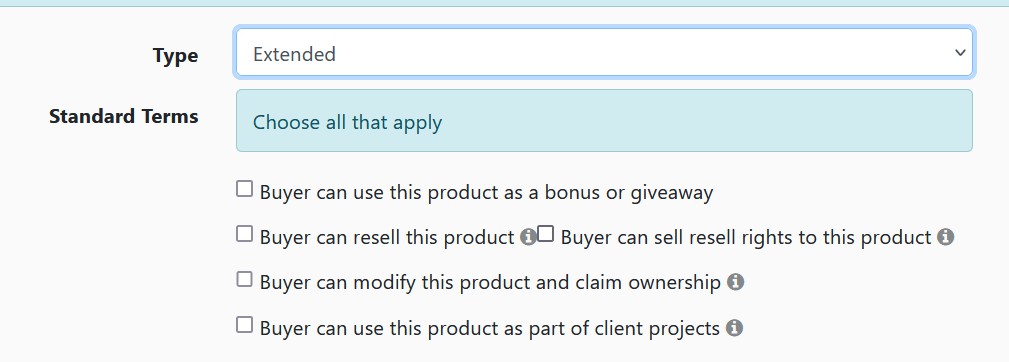
The extended use option is mostly used by vendors who are offering PLR rights, resell rights, etc.
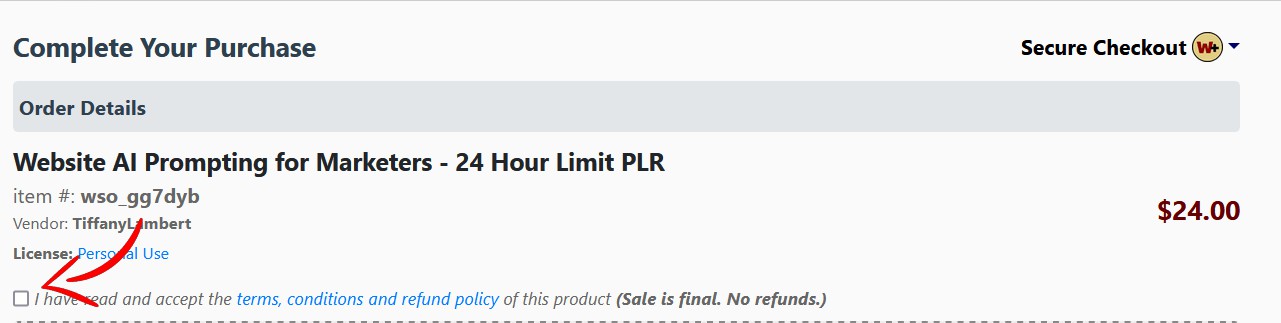
Refund policy
If you’re offering a 30-day money back guarantee, just add 30 in the field shown below. If it’s 14 days, then 14 and so on.

If you’re NOT offering a money-back guarantee, type 0 in the field.
When your product does not have a refund policy, buyers will need to check a box acknowledging the no-refund policy (before purchase).
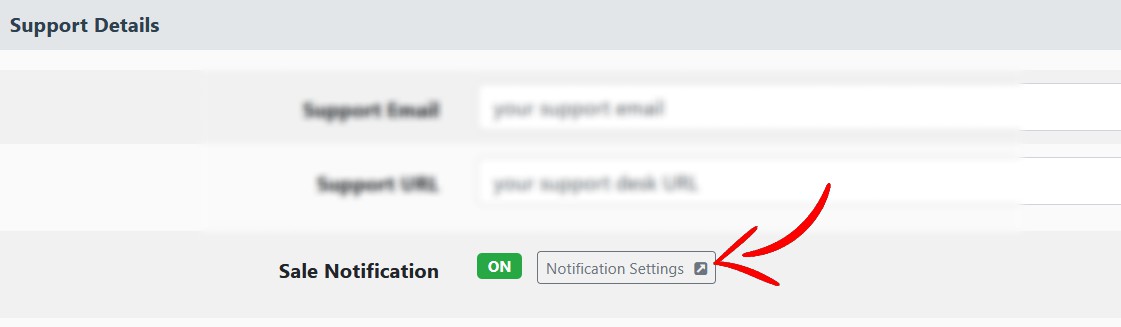
Support details
In this section, you’ll provide an email for your buyers to contact you, if they have access issues or enquiries.
If you’re using a support desk, just add your support desk URL to the ‘Support URL’ field.
You can add your details to both fields, but the W+ system will override your support email and just give your customers your support URL.
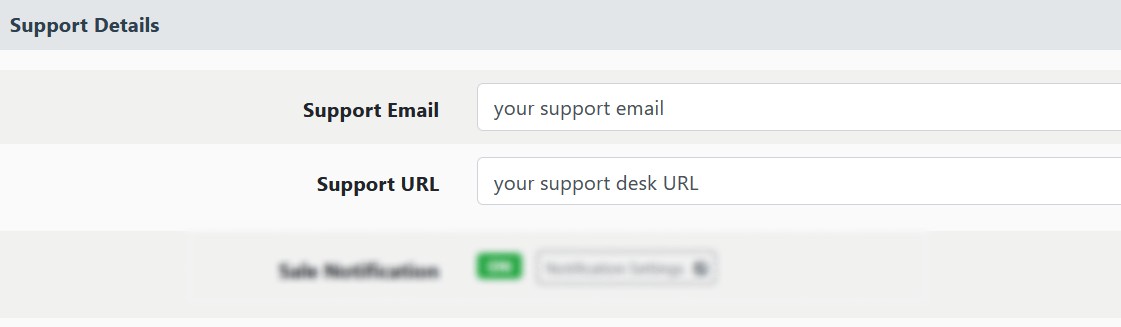
If you wish to get an email notifying you every time you get a sale, etc. just click on the button (shown below), and turn on the notifications.
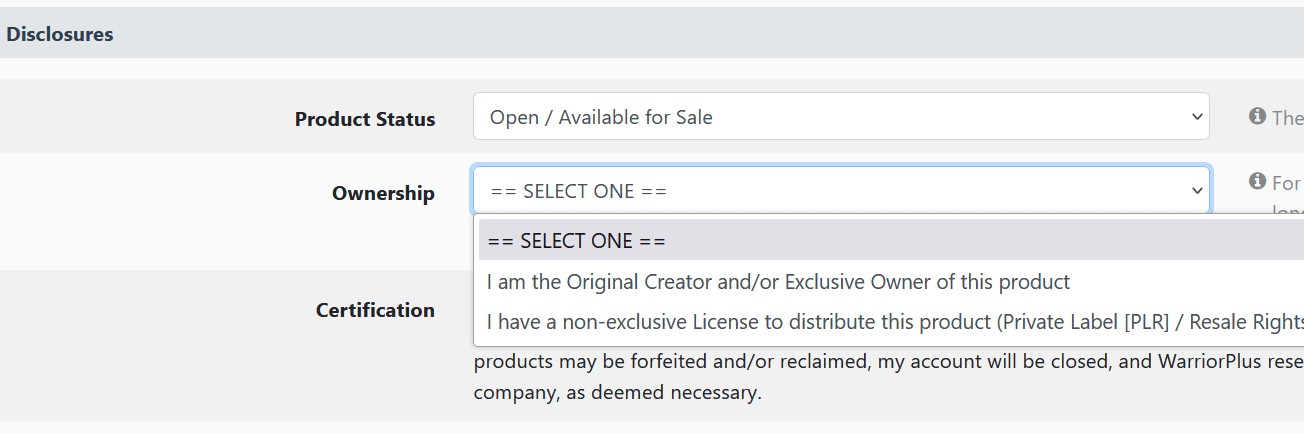
Disclosures
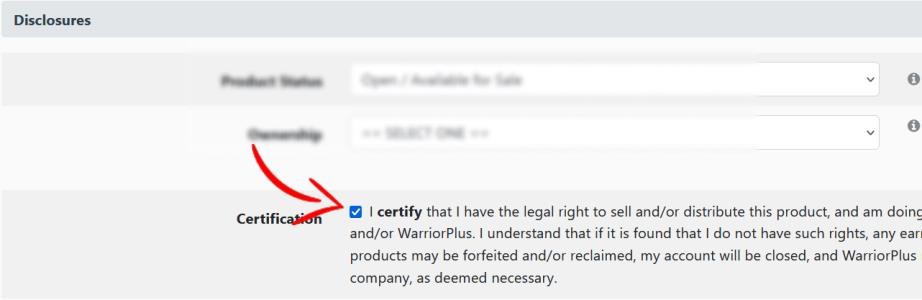
Under this section, set your product so it’s ‘Open/Available for sale.’ Then choose the ‘Ownership’ option that suits you.
Once that’s done, check the box (shown below).
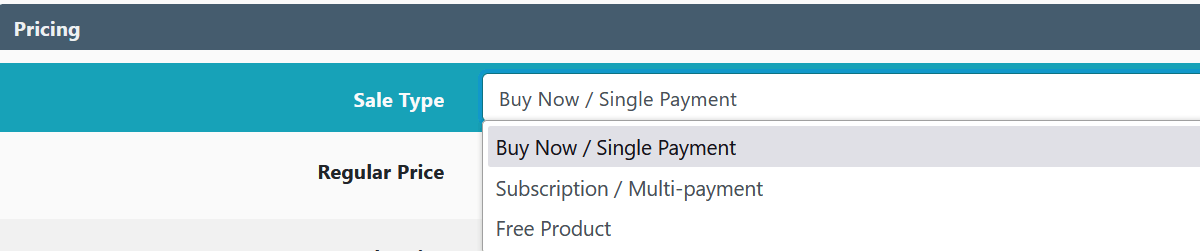
Pricing
Here’s where you set the price for your product. Choose whether you’re selling a standalone product… or a recurring subscription… or a free product.
Once that’s done, you’ll set a price for the product.
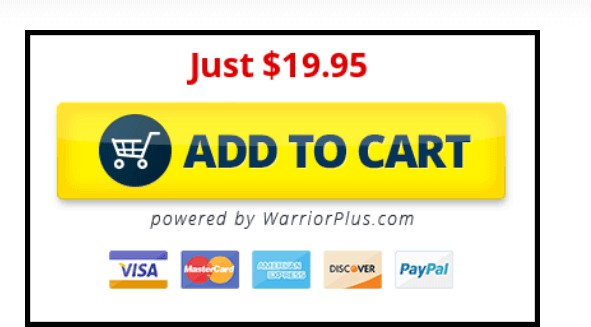
If we choose the ‘Buy Now / Single Payment’ sales type… in most cases, you’ll enter the price for your product in the ‘Sale Price’ field.
Let’s assume we set a price of $19.95, our buy button will look like this…
But if we set the Regular Price to $47 and the Sale Price to $19.95…
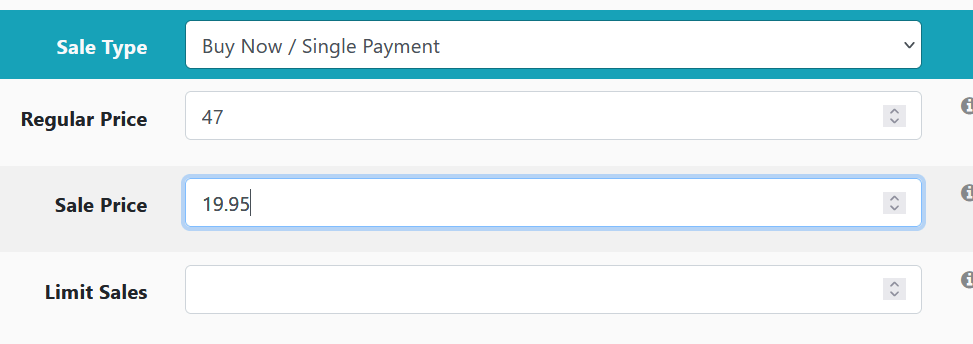
This is what our buy button will now look like…

Yes! There’s a regular price with a strikethrough. So it appears as though you’re giving the buyer a discount.
This may improve your conversions, but you’ll need to test it out and see for yourself.
If you wish to limit sales, just add the number of copies you wish to limit the product to, and once you’ve hit the number, WarriorPlus will display a ‘sold out’ sign on the buy button.

Merchant accounts
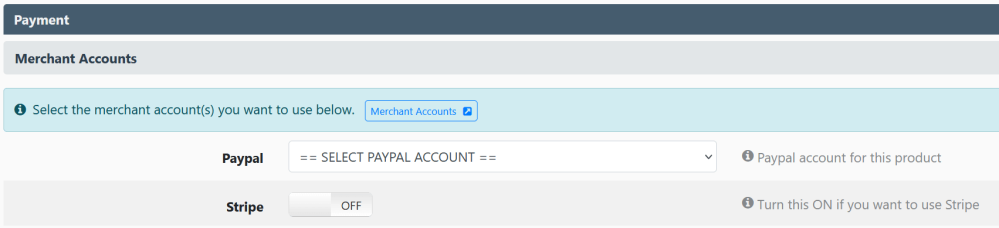
Setup your PayPal account here. Since you integrated it earlier, it should show up in the dropdown list. Choose it.
If you’ve enabled Stripe, you can turn that on too. Next up, you’ll see customer fields…

Our suggestion is that you ignore all of these.
You really don’t need your customers’ phone numbers or addresses to sell an infoproduct.
You’re not visiting them for Christmas… and people are generally hesitant to divulge too much personal information online. This is not Facebook.
In fact, the fewer details you ask for, the better – and your conversions will improve significantly.
You can ignore the ‘Cancel recurring on purchase’ field. We’re selling infoproducts, NOT a subscription/membership.
Affiliate
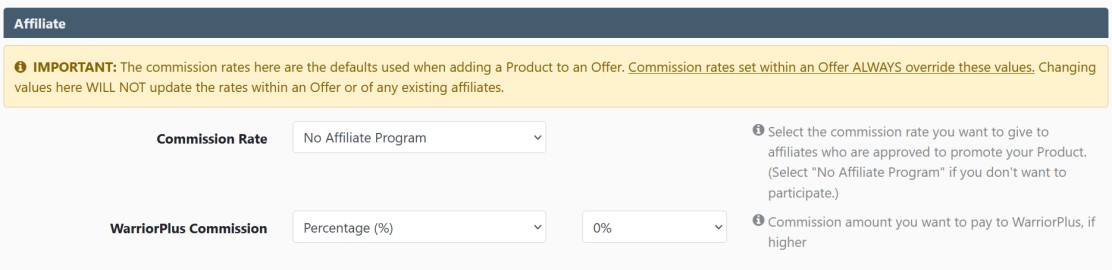
This is where you set your affiliate commissions. If you’re not using affiliates, you can leave it at ‘No affiliate program.’
If you decide to use affiliates, you can set the commission percentage here.

If you’re wondering how much to offer, it’s up to you. Generally, for products that are
$9.95 and below, 100% commission will help to attract more affiliates.
If it’s a $12.95 product, a 75% commission is good… and for any price above that, 50% will do.
There’s no right or wrong answer here – but the better the commission percentage, the easier it will be to convince affiliates to promote your product.
Now we come to an unexplained mystery in the WarriorPlus setting… The WarriorPlus Commission rate.

Here’s where you decide what percentage commission you wish to give W+.
Since your product may appear in the marketplace or Top Sellers list and so on, people who see your product on the platform may buy it.
In cases like these, WarriorPlus acts as the affiliate.
Brilliant… but here’s where it gets strange…
Even if you set the commission rate to 0%, WarriorPlus will still take the same commission rate as what you give your other affiliates.
For example, if you’re giving your affiliates 50% but set WarriorPlus to 0%, it will still take a 50% cut should the sale be generated off the platform. So be aware of that.
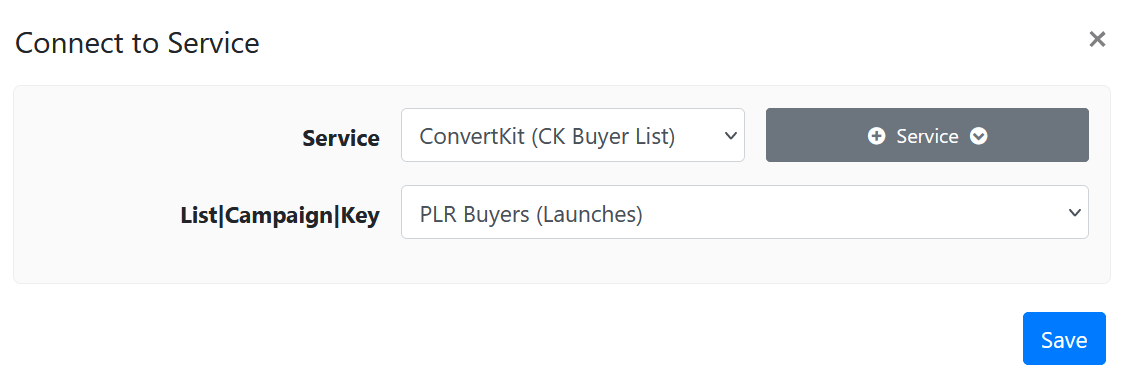
Email/webinar integration

You’ll integrate WarriorPlus with your email marketing tool here. Since we set it up earlier, you’ll just need to click on ‘New connection’ and choose your autoresponder and list from the dropdown.
Do note: You’ll need to create your list in your autoresponder first for it to show up in the dropdown menu here.
So if you’ve not done it, go set it up, then come back to WarriorPlus and configure this setting.
In this example, we’ll connect ConvertKit to WarriorPlus and name our list ‘PLR Buyers (Launches)’
This is what it’ll look like when we were setting up our email connection…
Once that’s done, we’re almost halfway home. Ignore all the settings below…

And click on the blue ‘Save’ button on the bottom right side of the screen.
Well done! You’ve listed your first product.
If you have any upsells and downsells, you’ll need to repeat this process and create a new product listing for each product in your funnel.
To speed up the process, you can clone your products and just tweak the relevant details…
Once your listing is created, go back to the ‘Vendor product dashboard’ here: https://warriorplus.com/vendor/products
You’ll see your product listing here…
Click on the listing and you’ll see this…

Click on ‘Actions’ (arrowed above) and this dropdown list will appear…
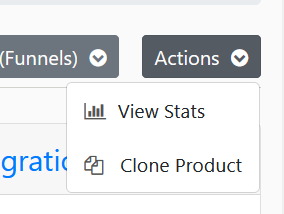
Click on ‘Clone Product’ and a new product listing will be created with all the same details you entered in your first listing.
From here, you just need to change the product name, price (if necessary), product access and so on.
Since a lot of the details such as category, licensing, refund policy, support details, disclosures, etc. will most probably be the same, you’ll save time by not having to fill these out again.
Creating new products will be faster and easier with the cloning feature.
For this tutorial, we’ve created 3 products just to show you how to build a funnel later on…
Once all your products are created, it’s time for Part 2 where we create the offer!
To get started, click on the offer dashboard here: https://warriorplus.com/vendor/offers
Part 2: Setting Up the Offer
When it comes to offers, there’s something you should know…
It doesn’t matter whether you’re selling a single, standalone product or several products in a funnel – you’ll still need to create an offer.
Create Your Offer – Step 1 of 2
Once you’re on the offer dashboard, click on the green button ‘New offer’…

This is what you’ll see…
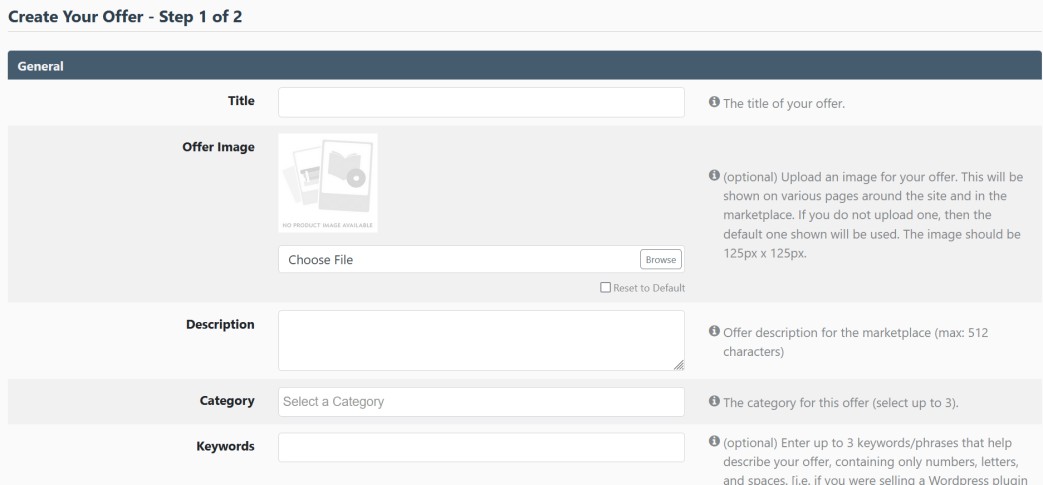
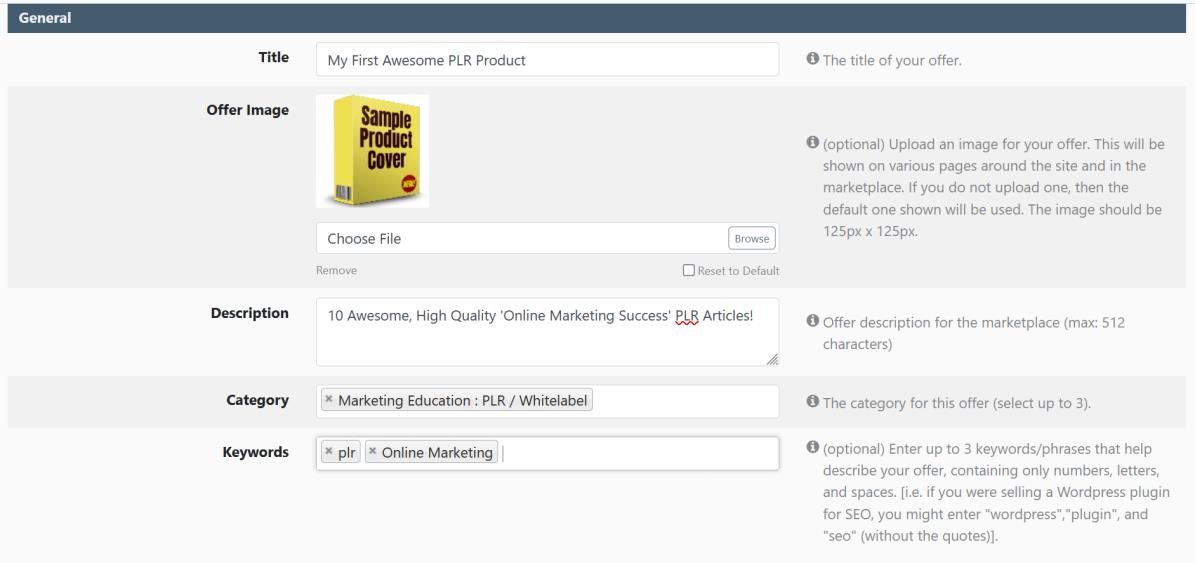
Fill out all the relevant details. Yes, even if you did it earlier in the product’s settings, you’ll still need to do it again here.
This is what ours looks like now…
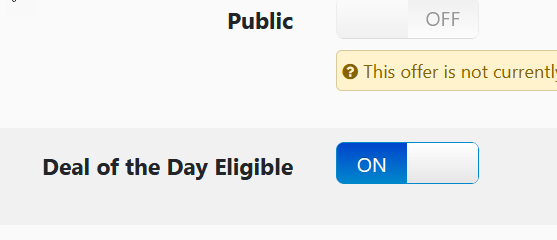
Availability
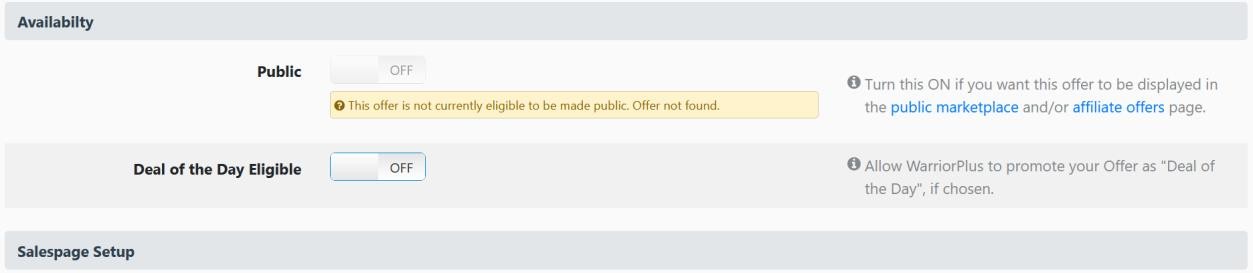
You’ll not be able to set your offer to public yet, because the WarriorPlus compliance team has not approved your offer yet. This will come later.
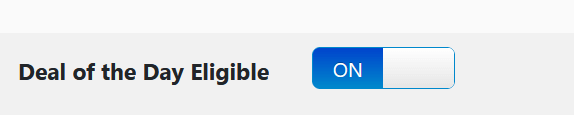
For now, if you want your product to be eligible for Deal of the Day, turn it on here…
Salespage Setup
In this section, all you’ll need to do is add the salespage URL to your offer here. If you have a funnel, this is where you add your front-end sales page URL.
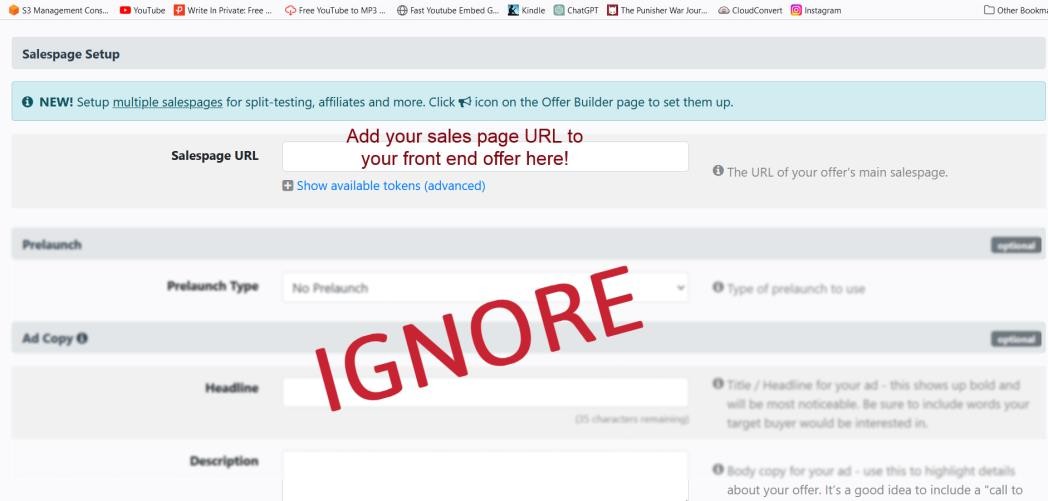
We’re not going to cover split testing here. Once you’re familiar and proficient with WarriorPlus, you’ll be able to figure it out on your own.
Similarly, ignore the prelaunch and ad copy sections.
We’re not using ads… and using a prelaunch page to capture emails is best used for launches that have a lot of hype prior to the launch.
If you’re new, most affiliates will only mail their list about your offer on the day it goes live. So a prelaunch page is unnecessary.
Once again, if you insist on having one, you can do it when you’re more familiar with WarriorPlus. For now, let’s just focus on getting your first product ready for sale.
Next, click on the blue ‘Create’ button in the bottom right side of the screen.
Create Your Offer – Step 2 of 2
After you click ‘Create’ you’ll see this page…
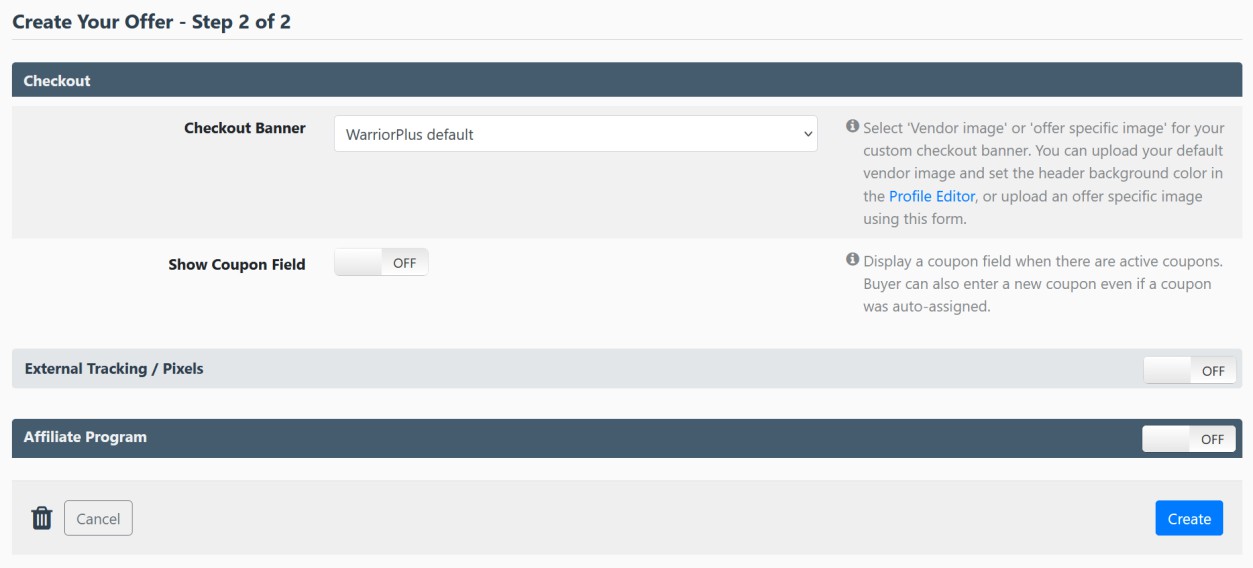
For this tutorial, we’ll not be using a checkout banner or coupons. Since we’re using affiliates, we’ll turn on the ‘Affiliate Program’ … If you’re NOT using affiliates, you can leave it off.
Points to note:
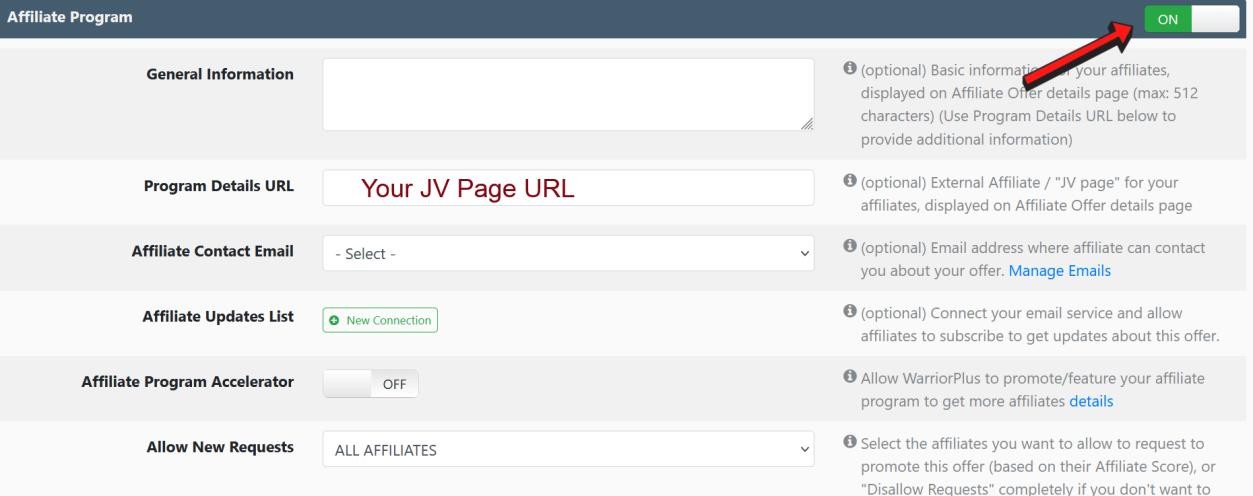
- You can add some basic info in the general information field or ignore it altogether.
- If you’re recruiting affiliates for a launch, it’s best to create a separate JV page with all the launch details – and add the URL to this page in the program details URL.
- Add your contact email in the ‘Affiliate Contact email’ so that affiliates can contact you if they have enquiries.
- If you wish to add affiliates to your email list so you can send them launch reminders and updates, connect your email list in the ‘Affiliate Updates List’ tab.
- You can ignore the ‘Affiliate Program Accelerator’ option and leave it off.
- When it comes to allowing affiliates to request approval, ideally, you’ll want to choose a 50+ score.
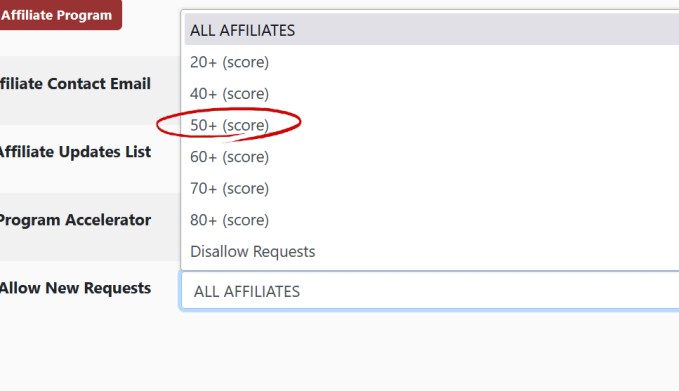
When approving affiliates, always err on the side of caution. Avoid affiliates with a bad track record (excessive refund requests).
Once that’s done, click on ‘Save.’
Congrats! You’ve created your offer… but there’s still more work ahead.
Part 3: Building Your Funnel
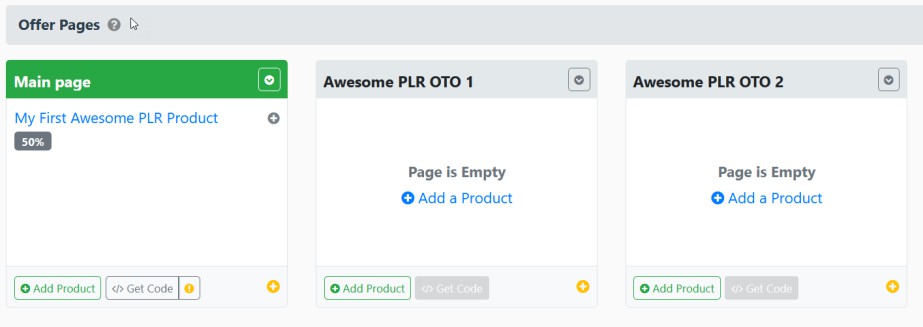
Once you’ve created your offer, your offer dashboard will look like this…
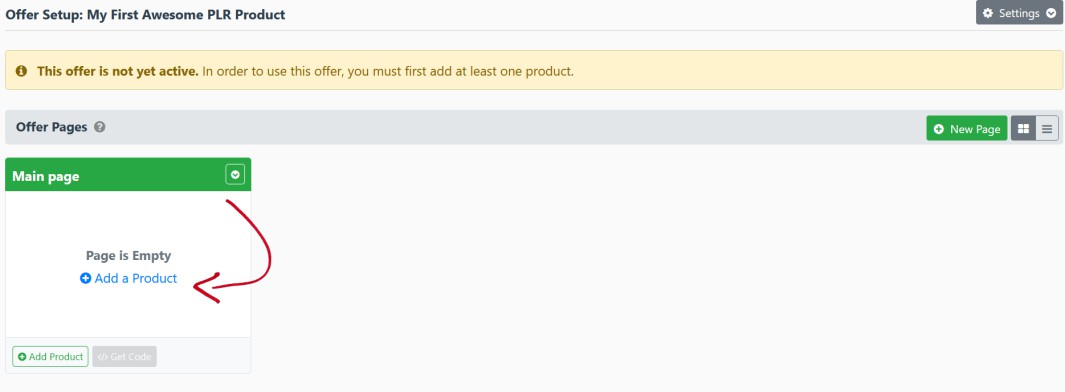
You’ve set up an offer, but there are no products in it. It’s time to add a product! Click on ‘Add a Product’ (arrowed above)
And you’ll see this…

Pay attention to where the 3 arrows are.
Click the ‘Available Products’ field and choose your product. If you have a funnel, this is the first product in your funnel.
Set your commission rate next. Any rate you set here will override the commission rate you set in your product listing – just in case you wish to offer affiliates higher commissions during a product launch.
If you want people who purchase your product to automatically be approved as affiliates, you can turn on the ‘Autoapprove Buyer’ option. It’s up to you.
Now let’s talk about the ‘Commission Bump’ feature.
Let’s assume that you’re offering a standard 50% commission across your funnel, this is the rate all affiliates will get.
But some affiliates who are experienced and can ‘bring the heat’ may want a higher commission rate. So here’s where you turn on the ‘Commission Bump’ setting…
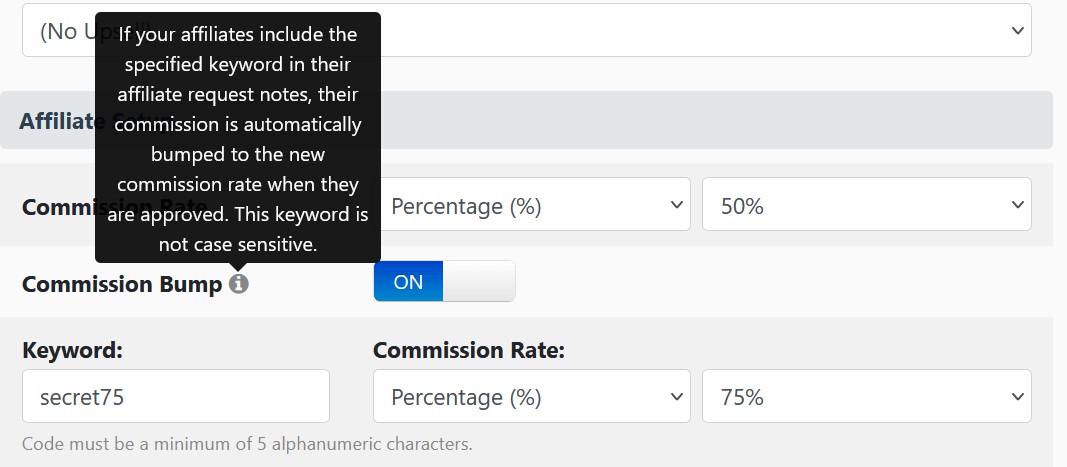
In the image above, you’ll see that we enabled the Commission Bump and added a keyword ‘secret75’ – and we set the commission rate for the bump at 75%.
All you need to do now is give the affiliates (who wanted a bump) the keyword (secret75) …
And when they’re requesting approval, they’ll add this code to their request and automatically be given 75% commissions – while the rest of the affiliates still get 50%.
When you’re done, click ‘Save’ and you’ll see this…
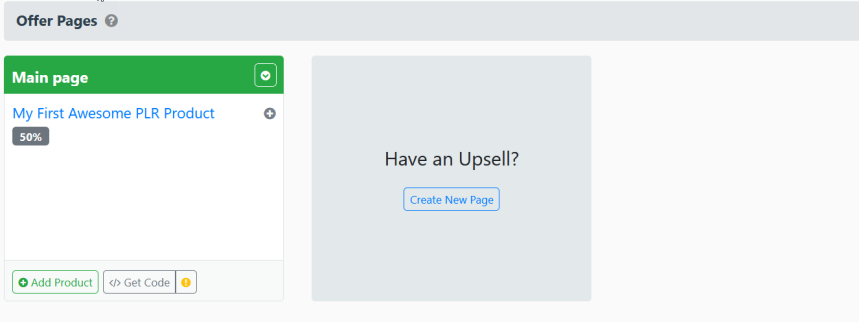
We now have one product in our offer. If this is a standalone product, we’d just get the buy button code.
BUT BEFORE THAT… let’s see what you need to do if you have a funnel with upsells and downsells.
Adding an Upsell
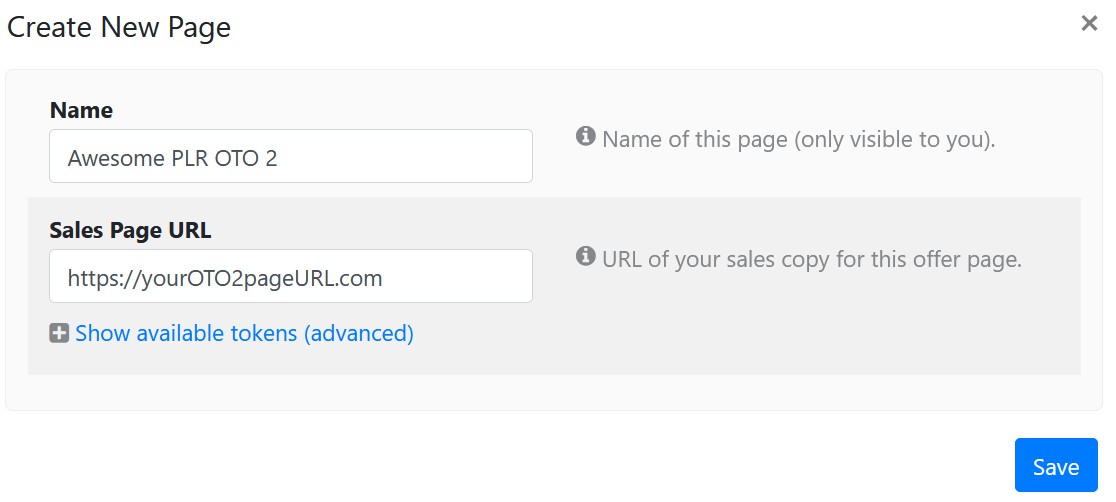
Click on the ‘Create New Page’ button…

This will pop up…
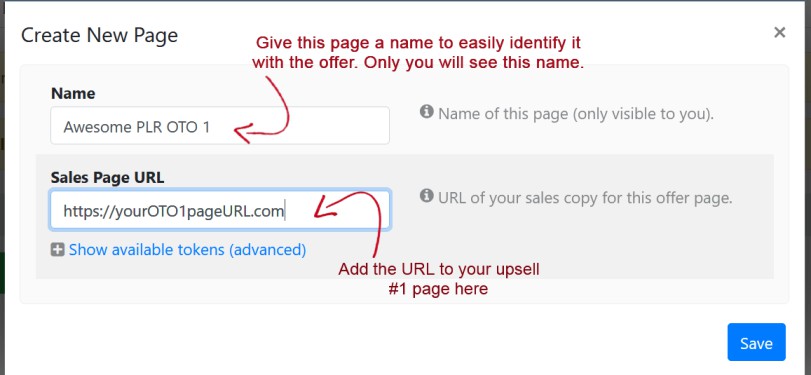
Follow the instructions in the image above and save the page. You’ll now see this…
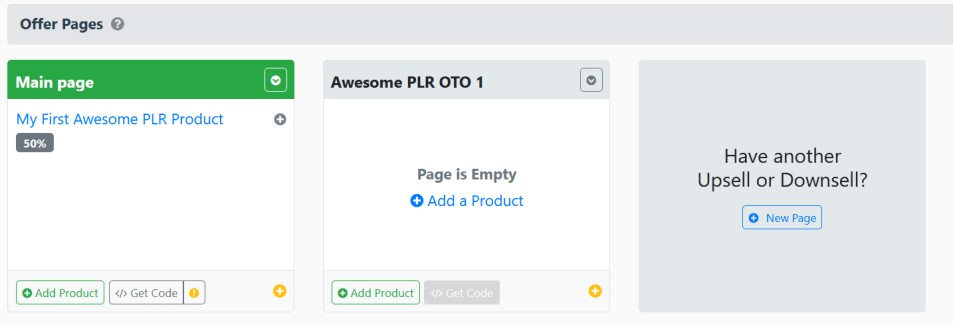
Since we have 3 products in our funnel, we’ll repeat the process again until we see this…
Do note: The URL for the 3rd page will be for your second upsell page.
Here’s where we stand…
We have 3 pages. The first page has our first product. The other 2 pages are empty. So now, we need to associate a product with each of these 2 pages.
We are creating the funnel here!
Once again, you’ll repeat the earlier process we went through when creating the first page. Choose your upsell 1 for the second page (Awesome PLR OTO 1) … and your upsell 2 for the 3rd page (Awesome PLR OTO 2).
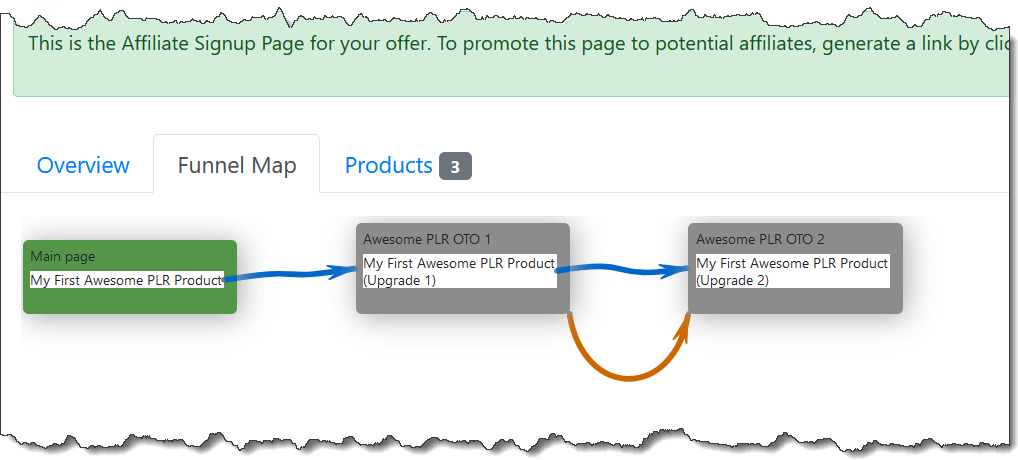
If you’ve done it right, your funnel will look similar to this (but with the names of your own products) …
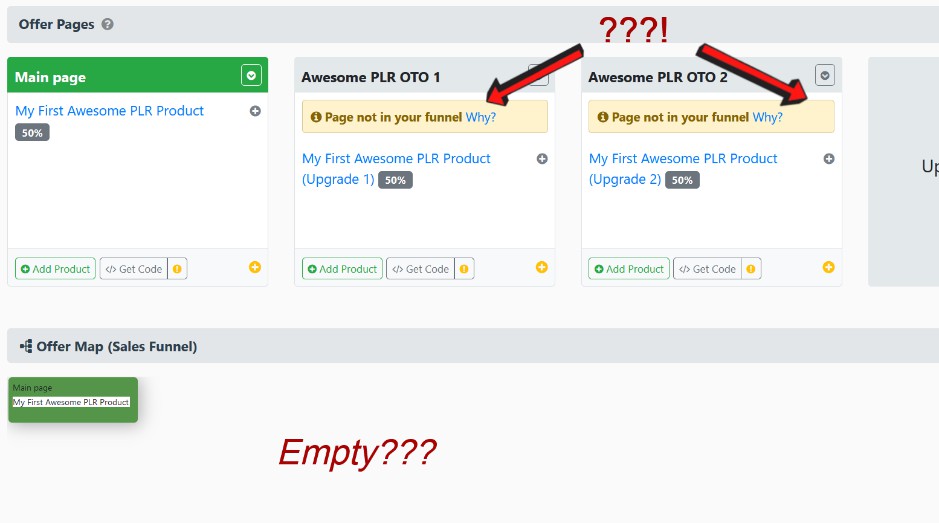
You may notice that there are 2 ‘warnings’ that the ‘page is not in our funnel.’
Don’t panic. Everything is on track. All the pages are in place… and we just need to connect them now.
As for the funnel map, while it’s empty now, the moment we connect the pages, it will miraculously appear… just like politicians who suddenly show up during election time.
But we digress.
Let’s connect the pages!
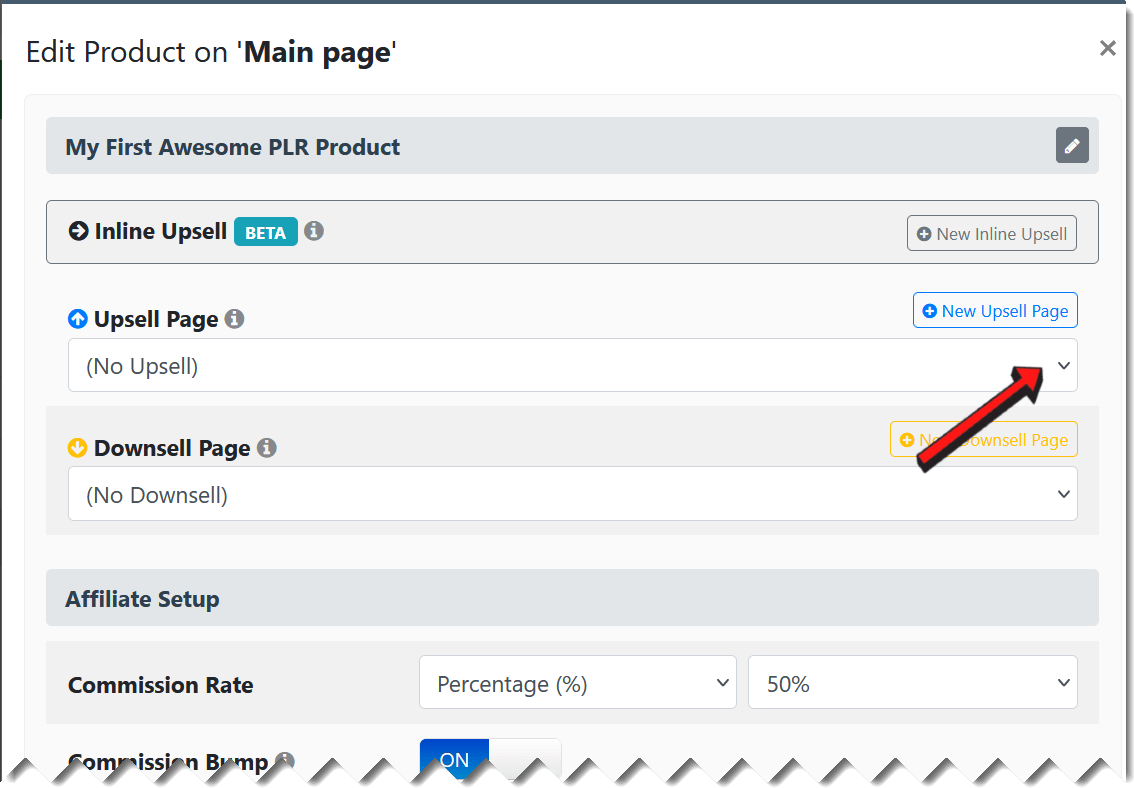
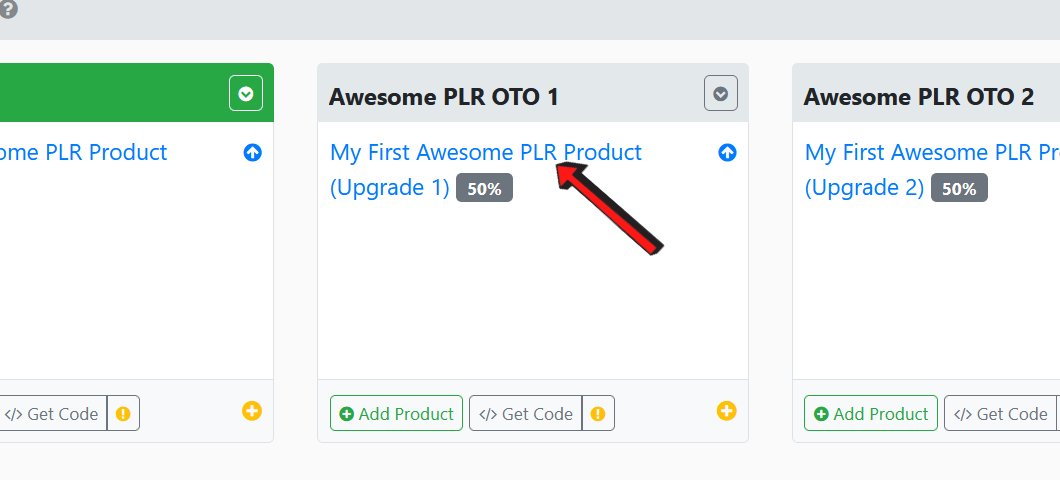
Click on the product in your first page.
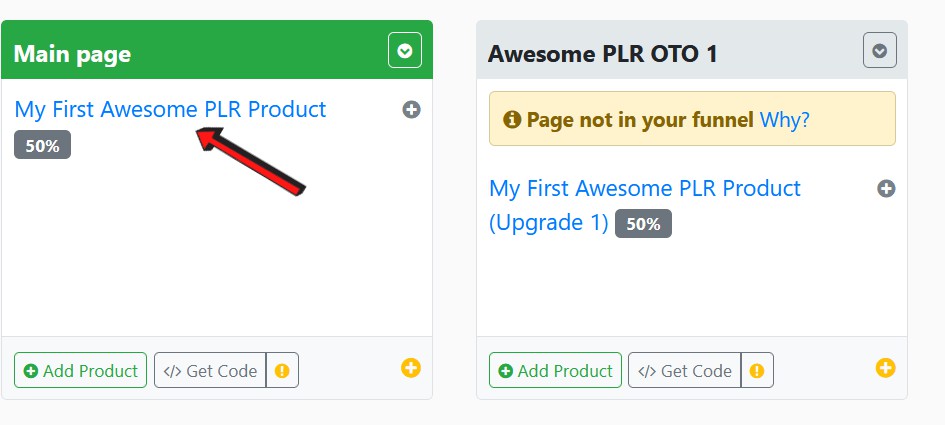
You’ll see a pop up like the image below. Click on the dropdown list in the ‘Upsell Page’ field…
And you’ll see the 2 pages in your funnel…
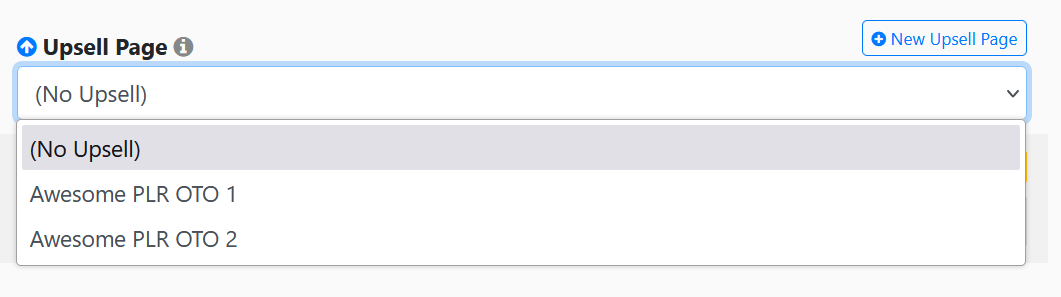
Excellent! Choose the correct page – in this example, it’ll be ‘Awesome PLR OTO 1’ – and click save.
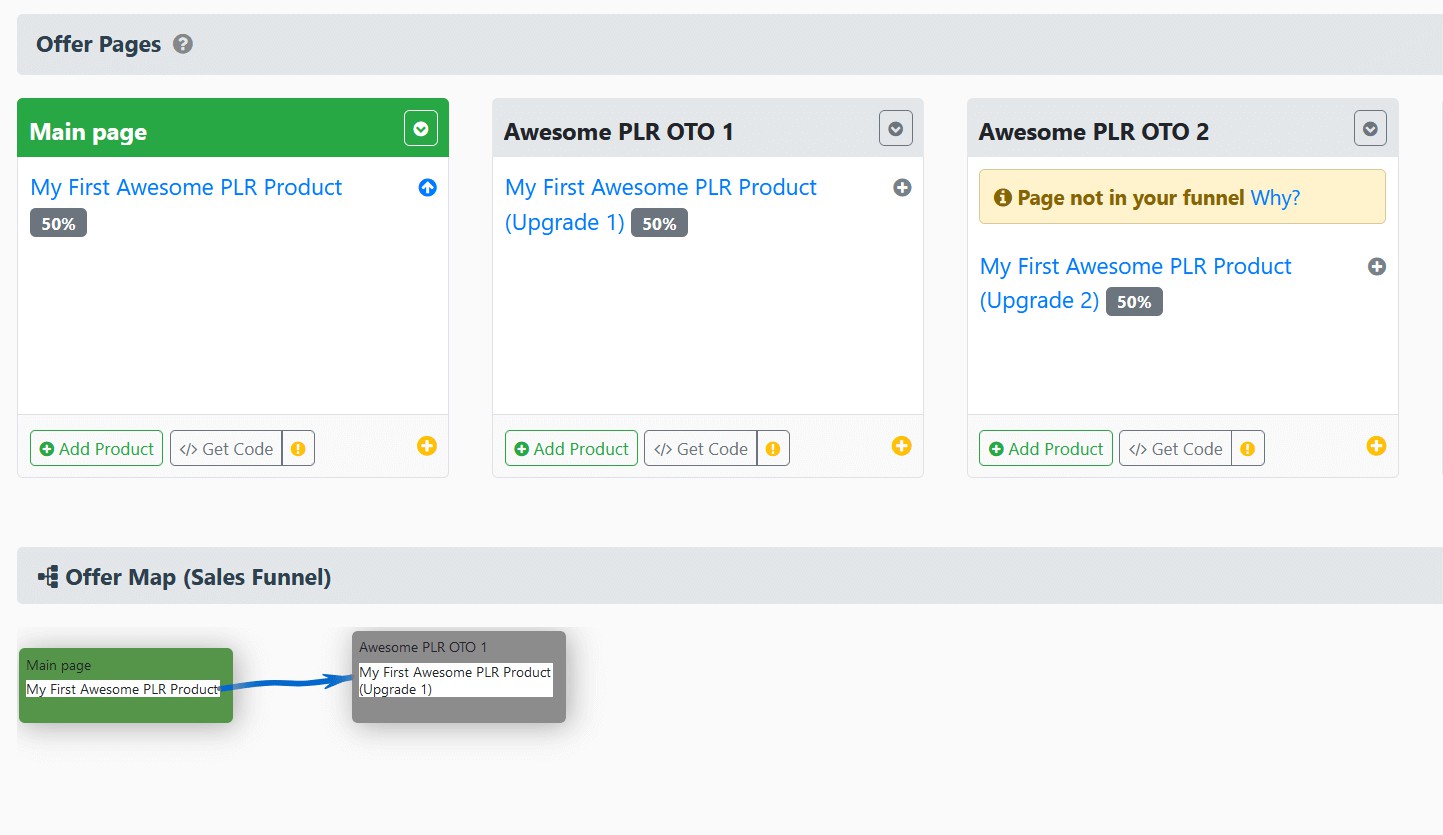
Notice how the warning has disappeared and suddenly there’s a little ‘connection’ in the Offer Map (sales funnel).
Now we’ll repeat the same thing with the second page… to connect it with the 3rd page.
And this is what it looks like now.
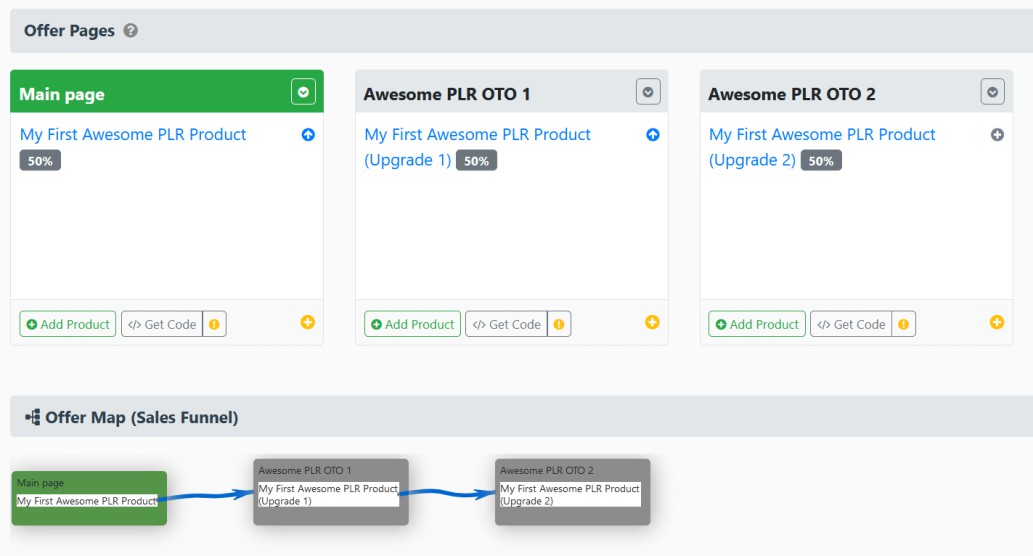
Quite a respectable little funnel map, but we’re not done yet.
Let’s assume someone buys our first product, but they don’t wish to buy the second product…
If we follow this funnel map (above), they’ll immediately be taken to the customer portal without ever seeing our 3rd product.
Gasp! That’s a catastrophe right there.
So what we need to do is offer a downsell if they pass on our second product. Of course, in this case, our downsell will be the 3rd product in our funnel.
Here’s how you set it up: Click on the product in the second page…
Look for the downsell field…
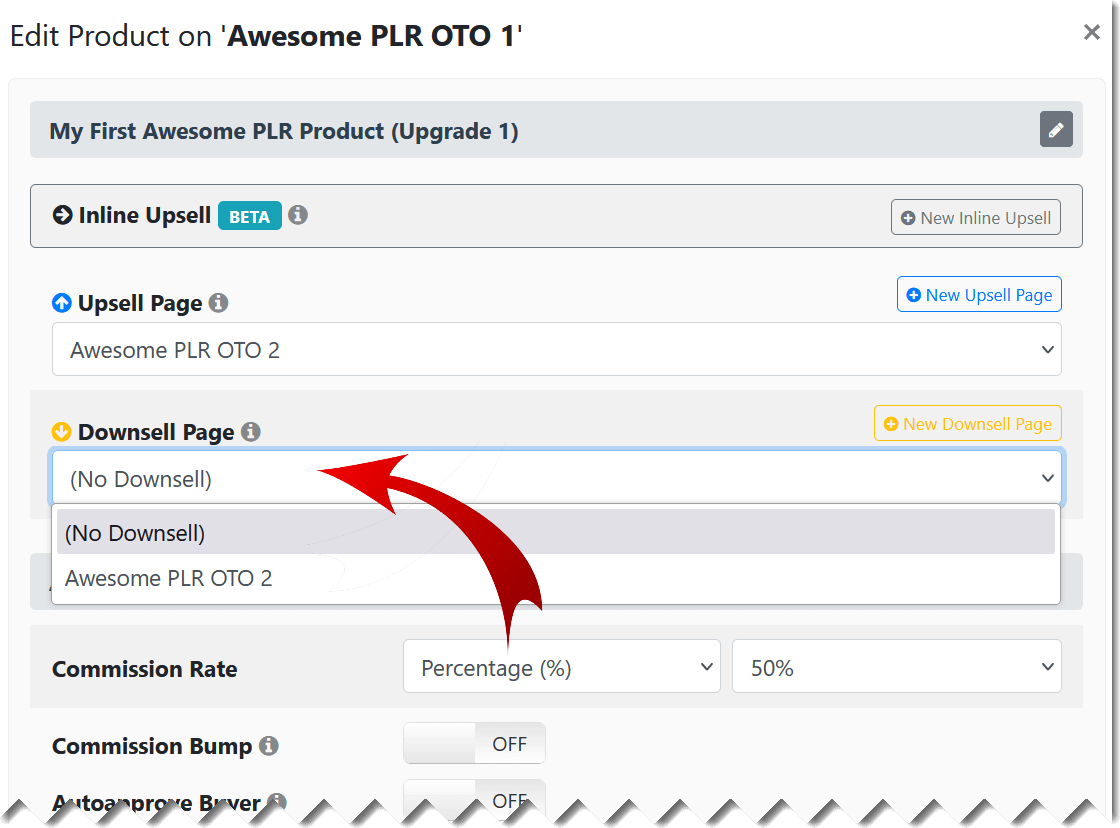
We’ll choose OTO 2 as the downsell and save it. Once that’s done, the offer map will look like this…
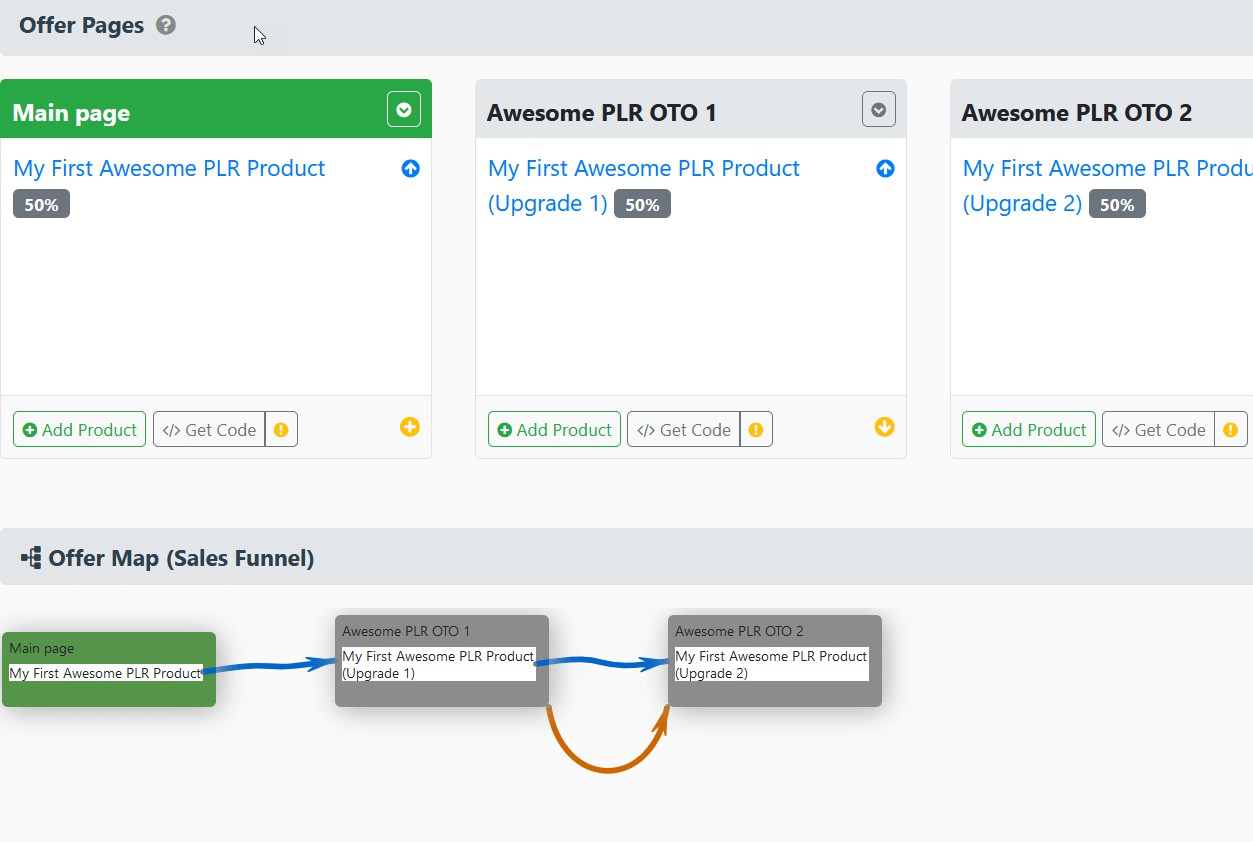
The blue arrows show the upsells and the brown arrow shows the downsell.
Once you understand the map and the process, you’ll know how to build any funnel to your liking.
That said, don’t go overboard and add 9 upsells and downsells.
Having a funnel that’s deeper than an oil well is only going to annoy your customers.
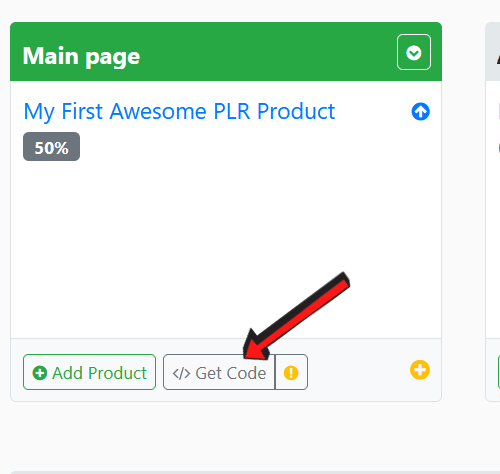
Now that the funnel is done, the rest is easy peasy! Let’s get our buy buttons…
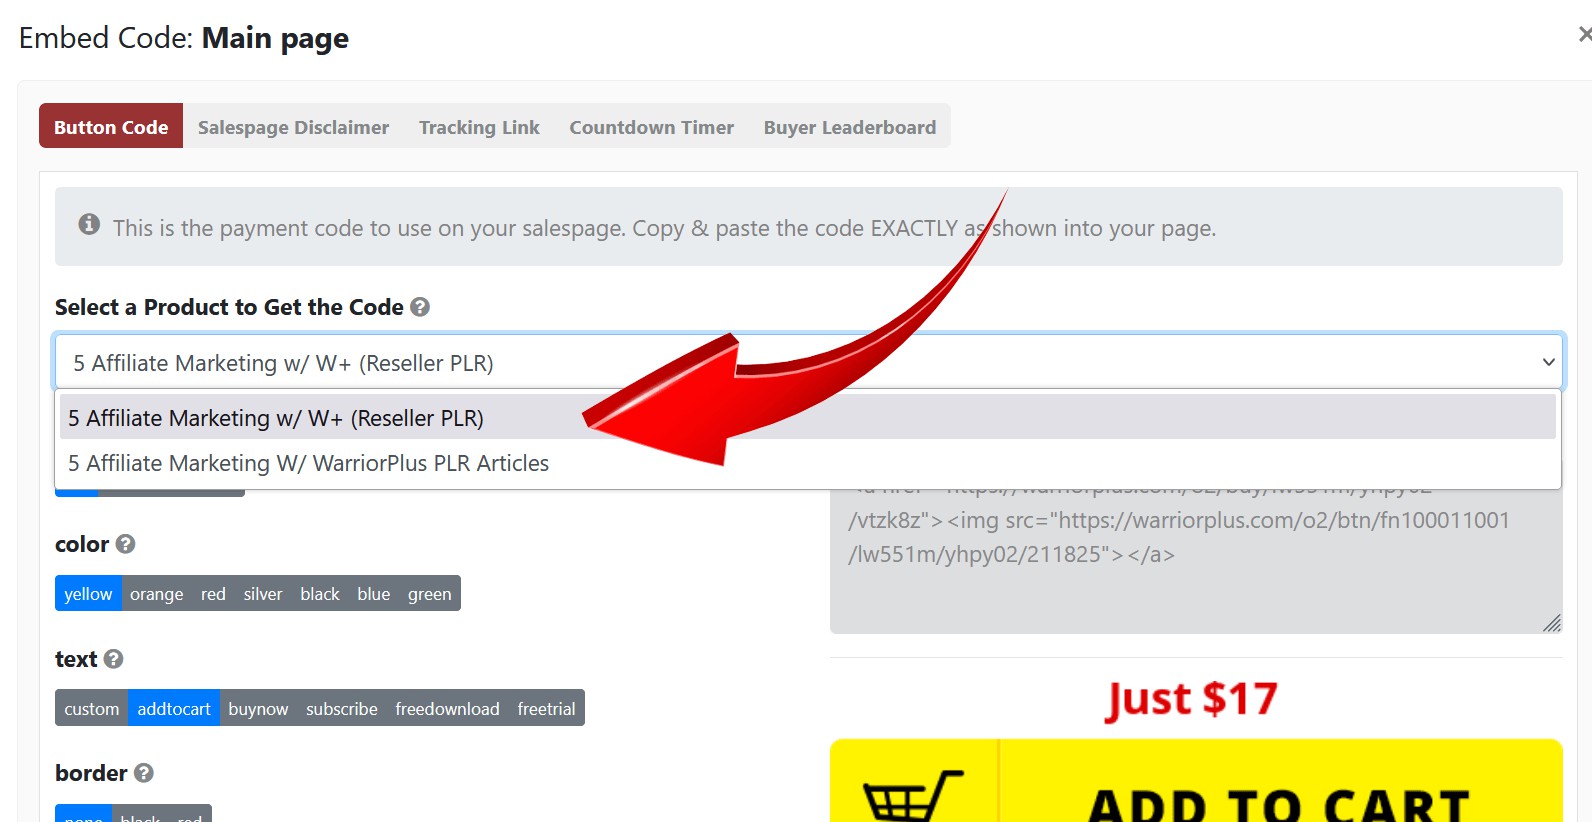
Buy buttons and disclaimers
To get your buy button code, click here.
This will open a new pop up…
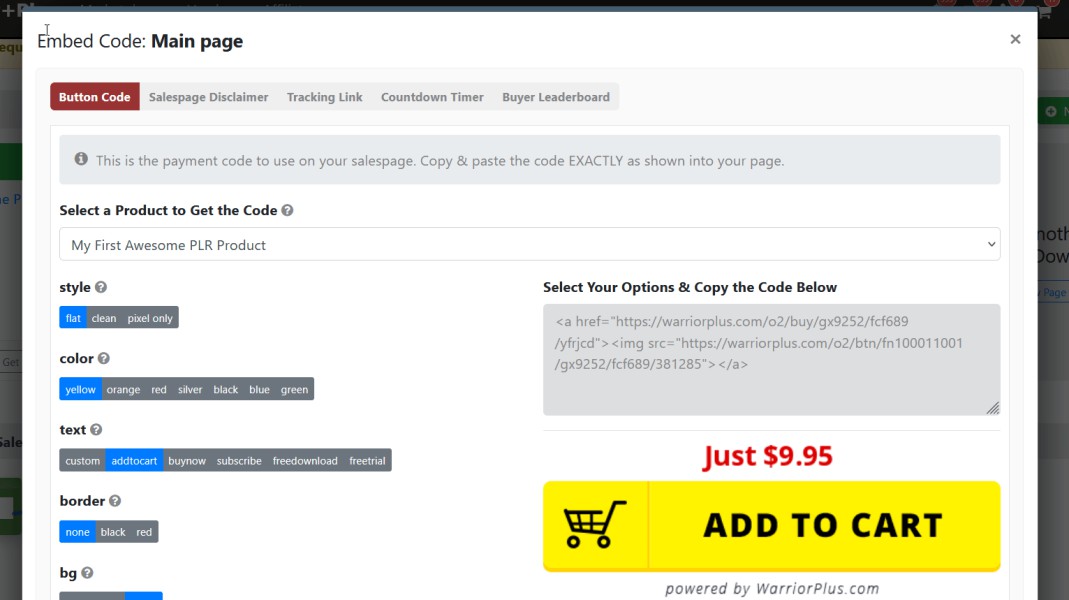
Here’s where you can design your buy button by choosing the different options. These are a few types of button designs we created:
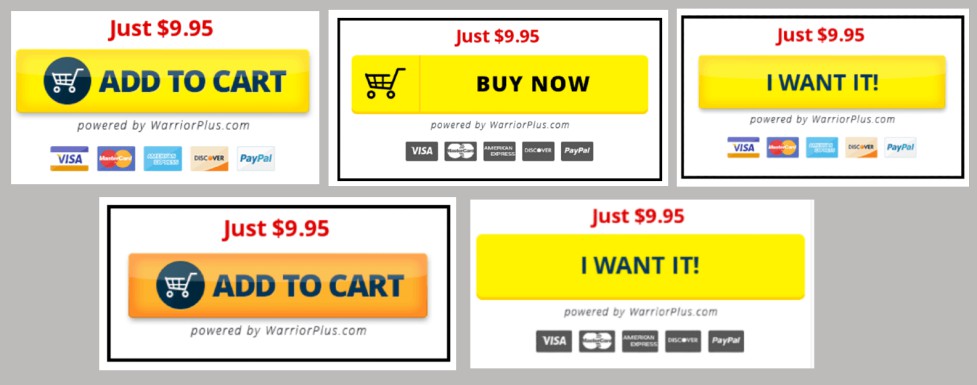
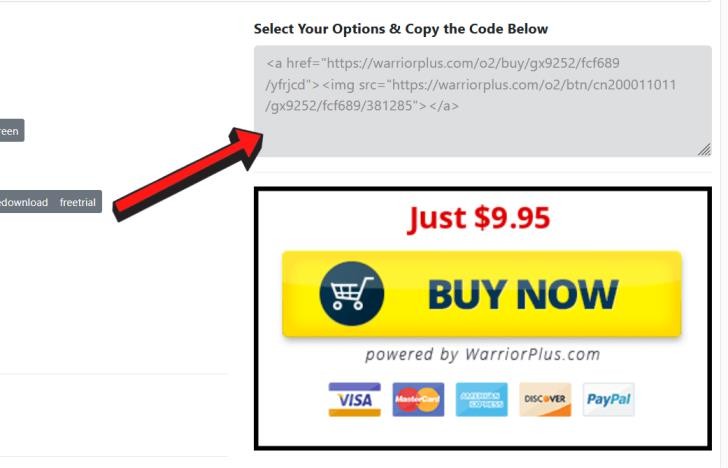
So design one that you like and AFTER you’re done… copy the button code (as shown below) – and embed this code on your sales page.
Once that’s done, click on the ‘Salespage Disclaimer’ tab…
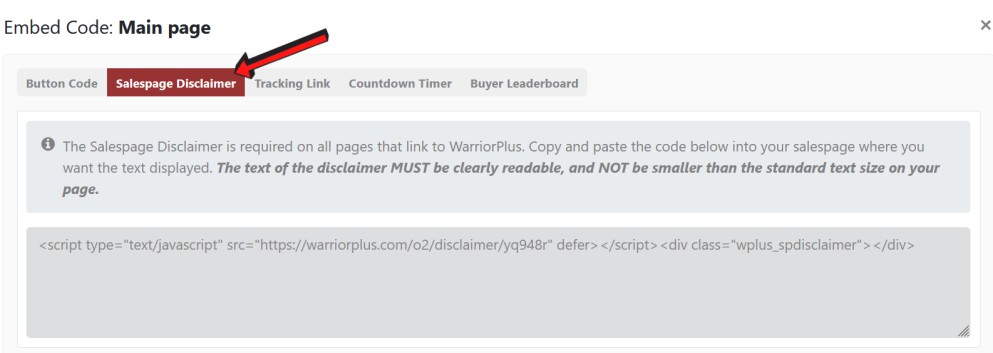
And embed this code at the bottom of your salespages (the disclaimer must be on all your upsell and downsell pages).
Once that’s done, click on the yellow icon here…
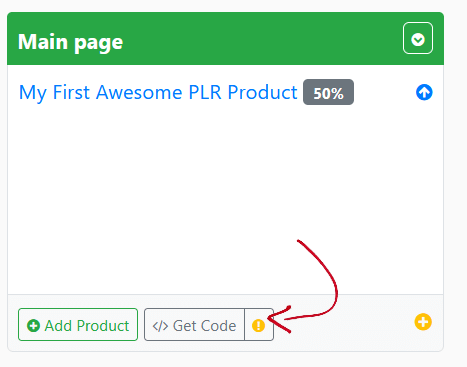
And if you’ve set everything up correctly, this will pop up…
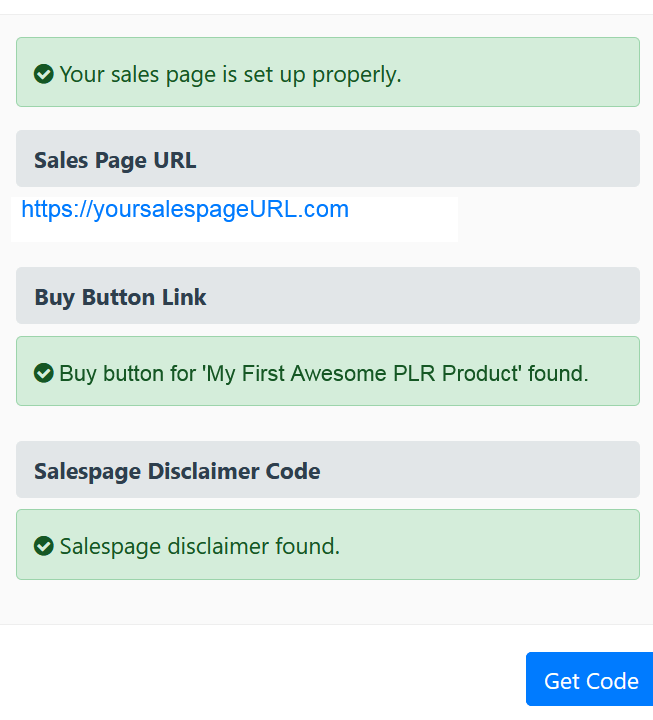
And the icon will turn green.
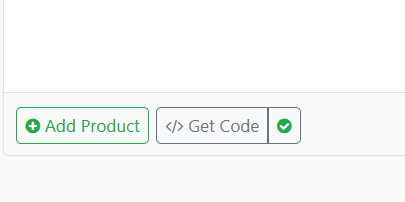
You’ll need to do this for the all the pages in your offer funnel and all should have green icons.
The upsell/downsell pages will have require an extra step – you’ll need to add a ‘No Thanks’ link to the bottom of these pages so that the buyers can be taken through the funnel accordingly.
You can get your ‘No Thanks’ link code here…
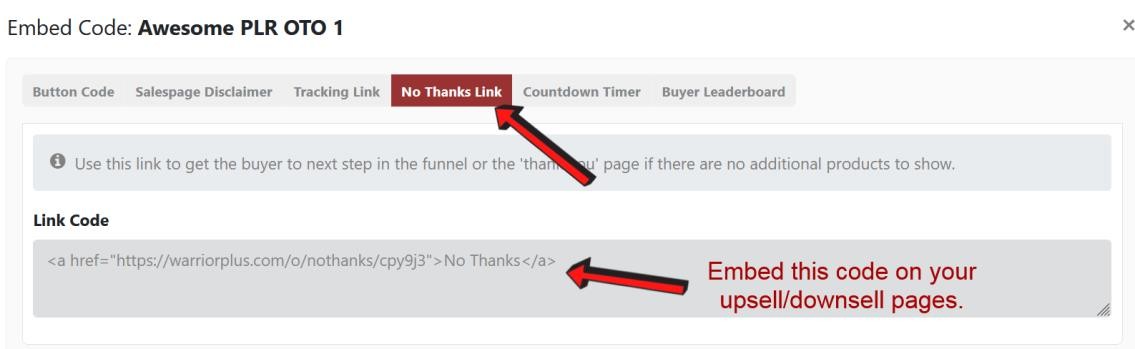
Embed this code on your upsell/downsell salespages
Once you’ve embedded all the codes, click on the icon and verify the links. It should all be green.
We won’t be using the other features such as ‘tracking link’, ‘countdown timer’ and ‘buyer leaderboard’ – they’re not necessary for now.
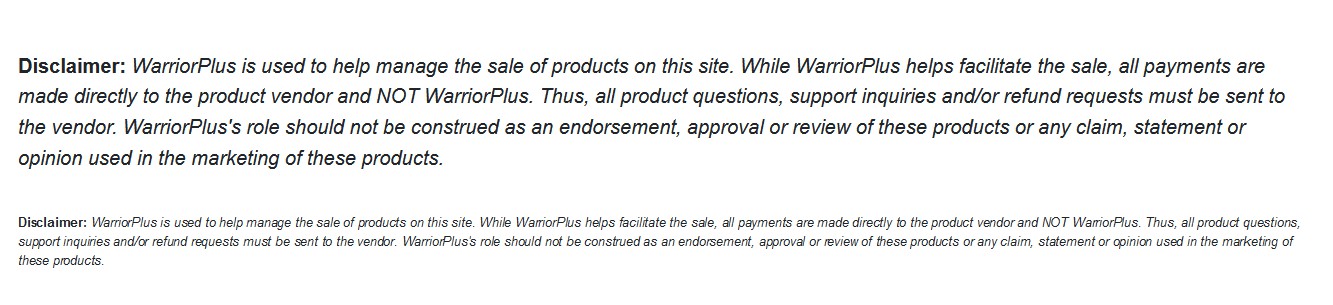
Quick note: Since the code for the disclaimer is javascript, the disclaimer may appear in extra small font, depending on the page builder you’re using (see below).

This is too small!
You don’t want this because it’s better for the disclaimer to be legible.
If you’re unfamiliar with code, you can always ask ChatGPT (https://chat.openai.com/) to fix the code for you.
Just use the prompt shown below:
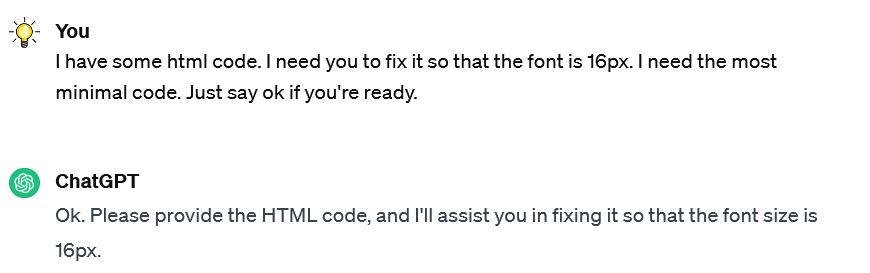
And ChatGPT will give you a modified code…
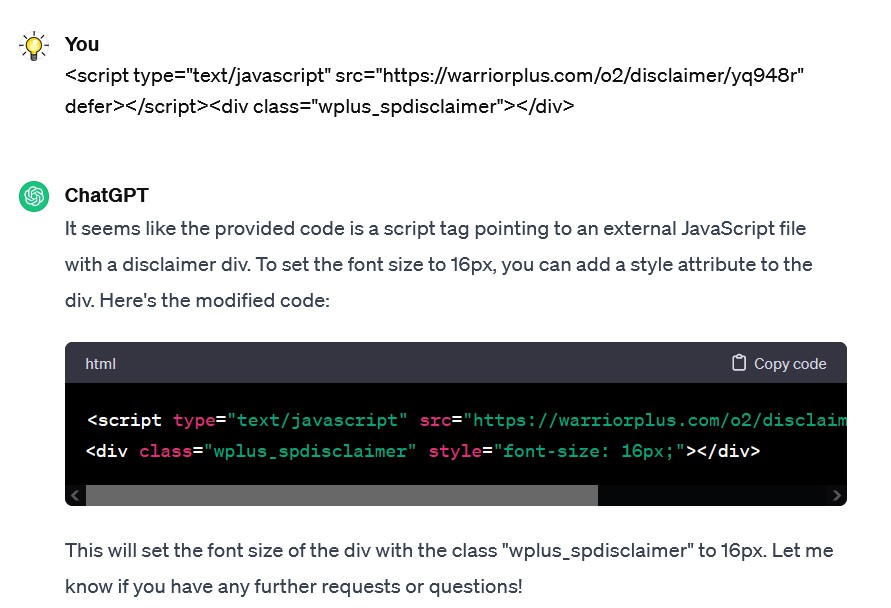
If we copied and embedded ChatGPT’s code in our salespage and compared the 2 results, we’ll see that the font is significantly bigger and more easily readable now… as compared to earlier.
Once all this is done, we’re almost home free.
There are just a few settings left to cover in the next chapter… but these are all simple and straightforward.
Let’s get this done!
Part 4 – Understanding the Settings
Once your offer is set up, the dashboard will look like this…
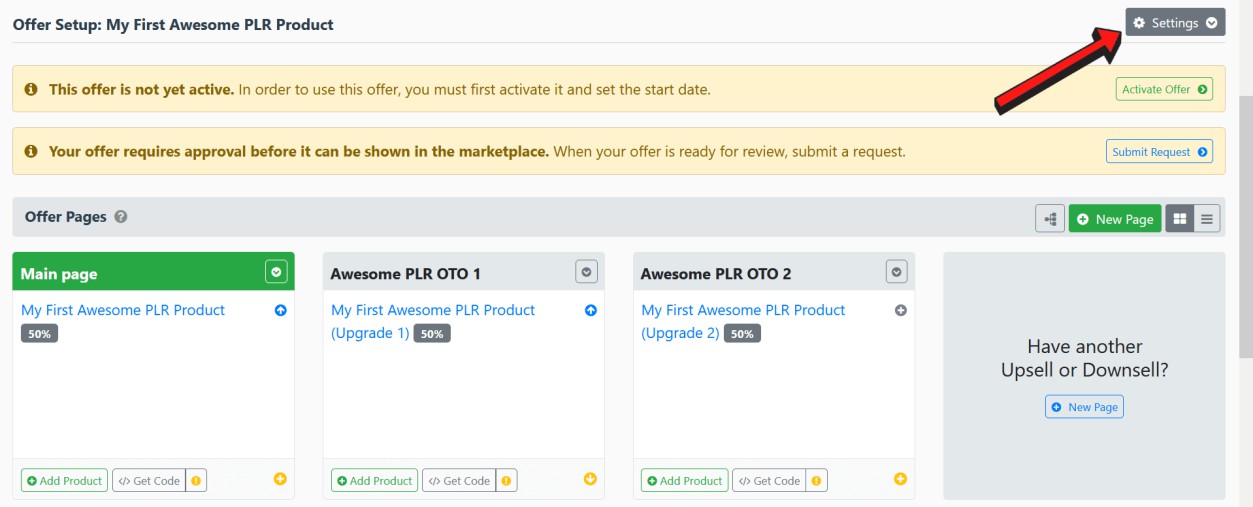
You’ll notice that it says the ‘offer is not active’ and requires approval. This is fine. We’ll get to this later. For now, click on the ‘Settings’ tab (arrowed above).
This dropdown list will appear…
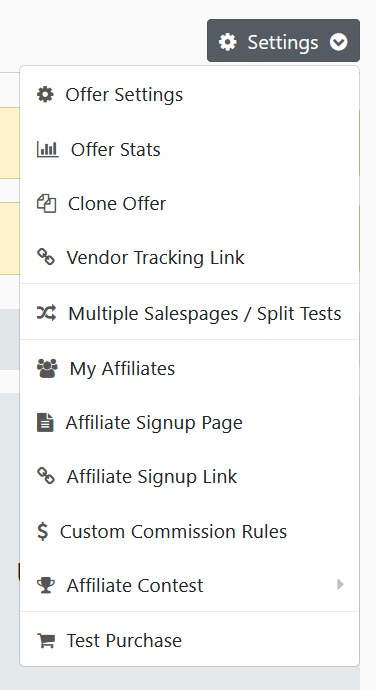
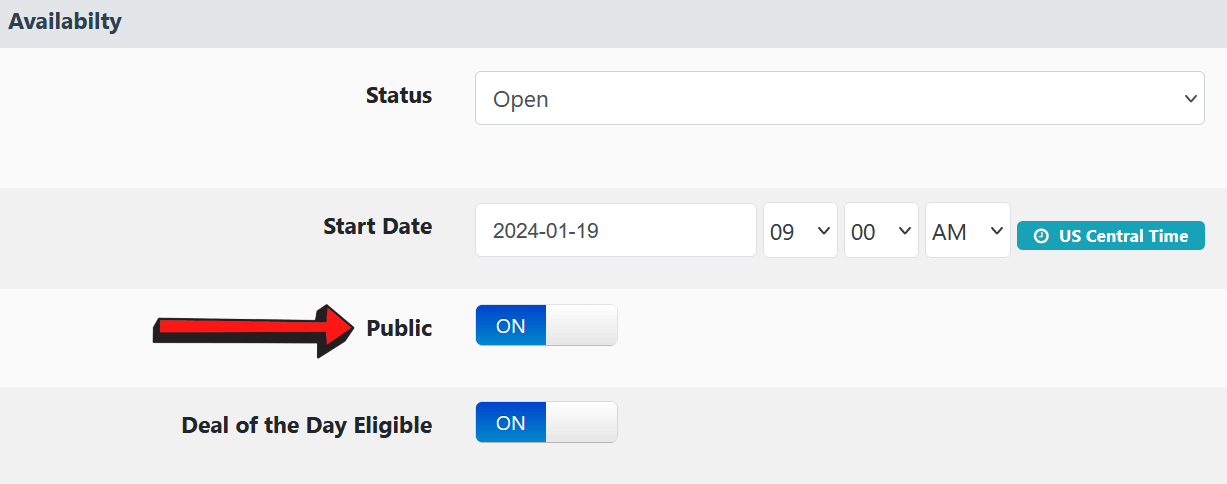
Click on ‘Offer Settings’ … scroll down until you see the ‘Availability’ section…
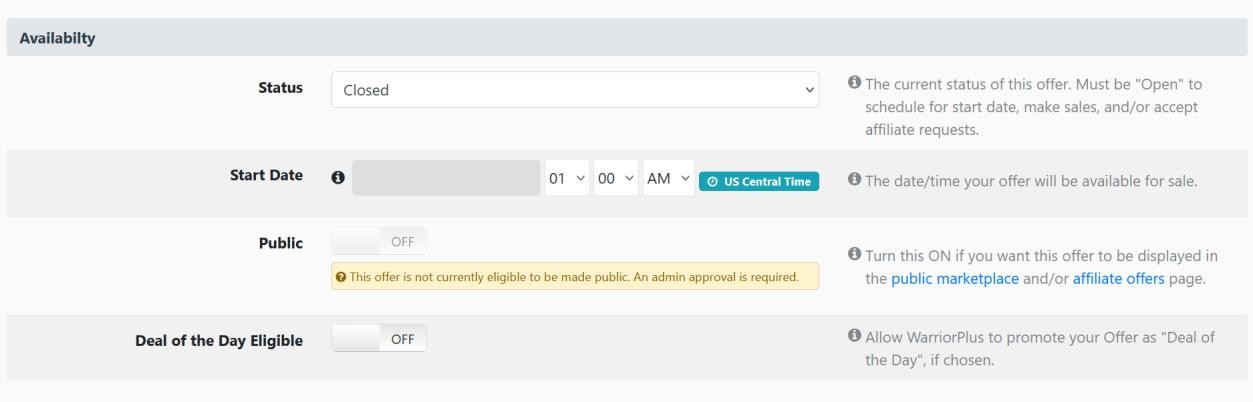
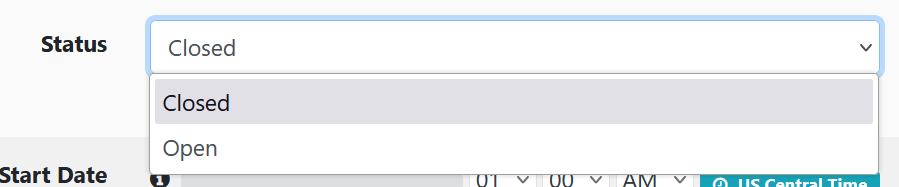
And set your ‘Status’ to open. This means you can accept sales.
From here, you’ll need to decide if you want to activate the product immediately for sale… or if you’ll be launching it in future.
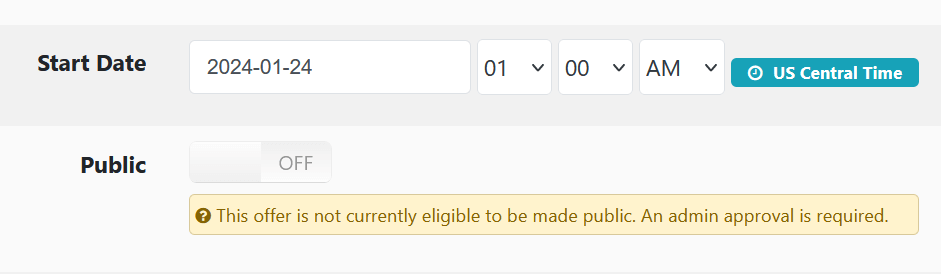
If you’re planning to make the product live in future, set the date and time here for when the product becomes available for sale.
Then your buy button will look like this…

It will show you just how many days or hours are left before the buy button will be active – and this button will be active automatically at the date and time you set.
Notice how the button says ‘Click Here to Join Early Bird List’?
If you had set a prelaunch page in the settings earlier, this link would take potential buyers to that page where they could opt in to your list – and receive a reminder email from you when the product is live and ready to purchase.
If you’ve not set up a prelaunch page, when people click on the button, it’ll just say, “Product is currently unavailable”

Next… you’ll need to make a decision – Is your offer going to be private or public?
If you’re running a private offer to your email list and don’t wish for it to show up in the WarriorPlus Marketplace – it’s simple…
Just scroll down and click on the ‘Save’ button.
However, if you want your product to show up in the marketplace and be eligible for deal of the day, you’ll first turn on the ‘Deal of the Day’ option.
Then click on the ‘Save’ button. You cannot set it your offer to ‘Public’ here. You’ll need to get approval from the WarriorPlus compliance team first.
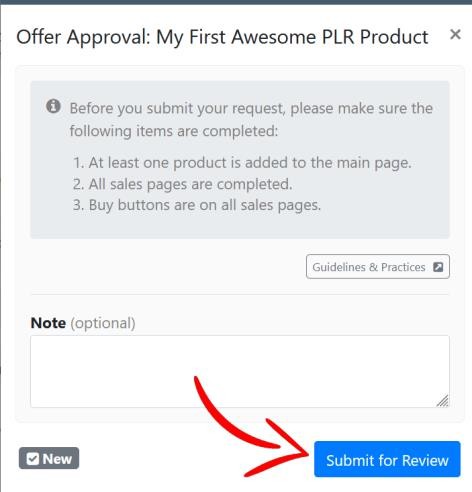
To do that, go back to your offer page and click on ‘Submit Request’…

When the popup appears, make sure you meet all the stipulated guidelines and click on ‘Submit for Review’.
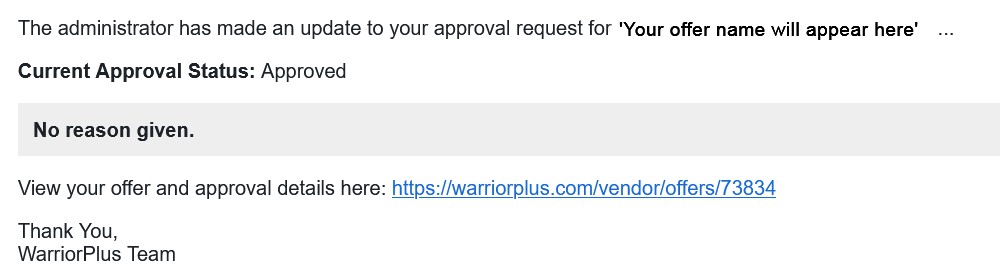
Once your offer is approved, you’ll receive an email from WarriorPlus informing you of your decision…
Now, you’ll need to go back to the Offer Settings… and set it to Public. Only after you’re approved by WarriorPlus can you turn this setting on.
So it’s best to submit your offer for approval a few days before your launch to give the compliance team time to approve your request.
The next step will be to go back to your Offer Dashboard and click on ‘Activate Offer’ – if you see that alert there.

Now let’s look at the other settings:

Offer stats: Once you start making sales, you can click on this option to see stats such as the number of views, visitors, sales, refunds, and revenue.
Clone offer: This feature is similar to cloning products – but in this case, it will clone the entire offer… and you can easily tweak things to make setting up your future offers much faster.
Vendor tracking link: If you’re promoting your product on your own after your launch is over, you can use the vendor tracking link. This will cookie the sale to you – and allow you to track how many sales you make
Generally, affiliates frown upon vendors who use their own tracking link to override cookies during a launch – thereby ‘robbing’ them of commissions. So you’ll need to be cautious here, if you’re using a vendor tracking link during a launch.
But if you’re still promoting your product months after your launch is over, it’s fair to use your own tracking link because you need to be fully rewarded for your efforts – since most affiliates would have long forgotten your product and have moved on to newer offers.
Multiple salespages/split tests: We’ll ignore this since we’re doing a split test.
My Affiliates: This is where you’ll see all your affiliate requests and you can decide whether to approve them or not.
Affiliate Signup Page: This is an important one to take note of.
Your affiliate signup page will look similar to the image below – and there are 4 things to take note of here (see numbers in image below) …
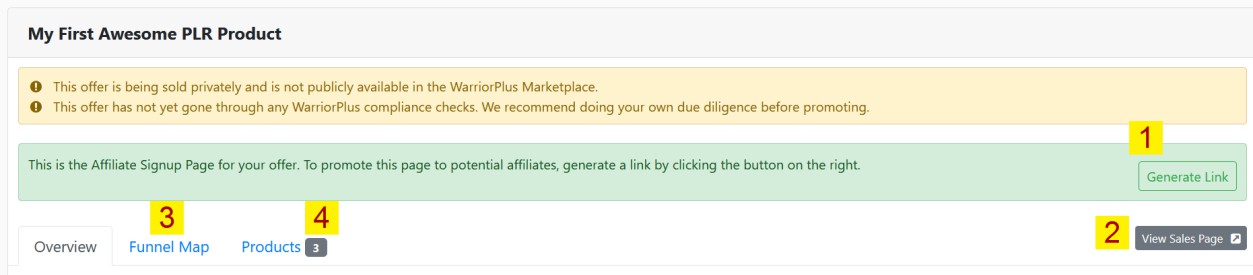
- When affiliates click on the ‘Generate Link’, they’ll get their affiliate link to promote your offer. This link will track their sales, conversions, etc.
- If they click on the ‘View Sales Page’ tab, they’ll see your sales page, and if it’s a funnel, they’ll only see the front-end sales page. (This is why you added your salespage URL in the offer settings earlier).
- If they click on the ‘Funnel Map’, they’ll see your entire funnel.
- If they click on the ‘Products’ link, they’ll see the products and prices (and commissions) they’ll earn from each sale.

This page will give affiliates all the details they need to know before promoting your product.
It also serves as a ‘checklist’ for you to ensure that your funnel, products, and sales page are all set up correctly.
Affiliate Signup Link: This link will take affiliates to the signup page.
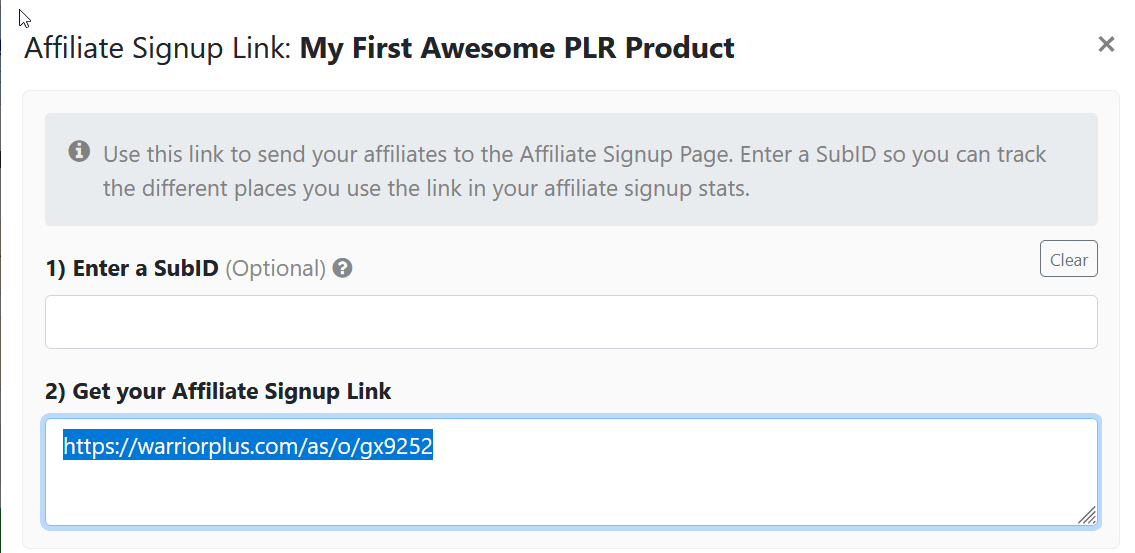
You might be wondering why there is both an affiliate signup link and signup page.
This is probably for convenience.
When you need to add a link on your JV page, you can just use this ‘Affiliate Signup Link’ … or if you’re on Facebook (or in email) and an affiliate reaches out to you to ask how they can promote your offer, you can use this link.
It’s easy!
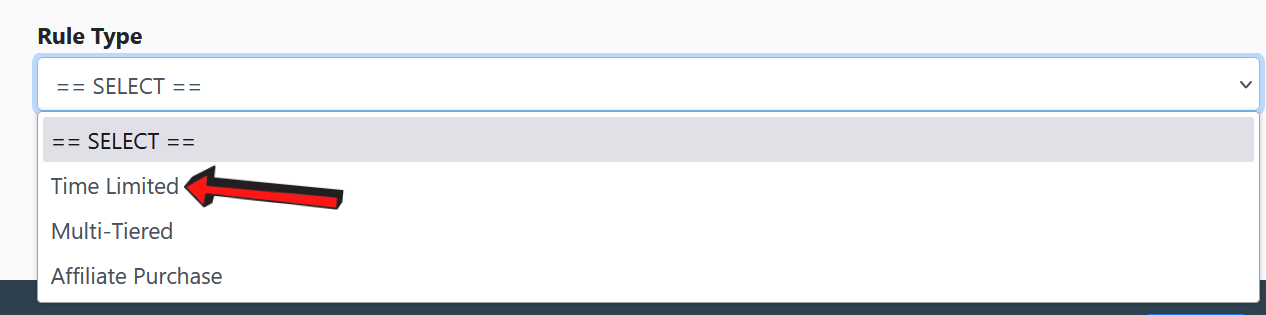
Custom Commission Rules: This is a very interesting feature and definitely something you should be aware of.
Let’s assume we want to change our commission rates once the launch is over.
For example, if you’re offering 100% commissions on your front-end offer during a launch, but want to reduce that to 50% once the launch is over, here’s where you set the rule.
Do note: You should mention the commission rates and how they change (after the launch) in your JV page details. This will keep affiliates informed and they won’t think you’re shortchanging them.
When we click on ‘Custom Commission Rules’ you’ll see this…
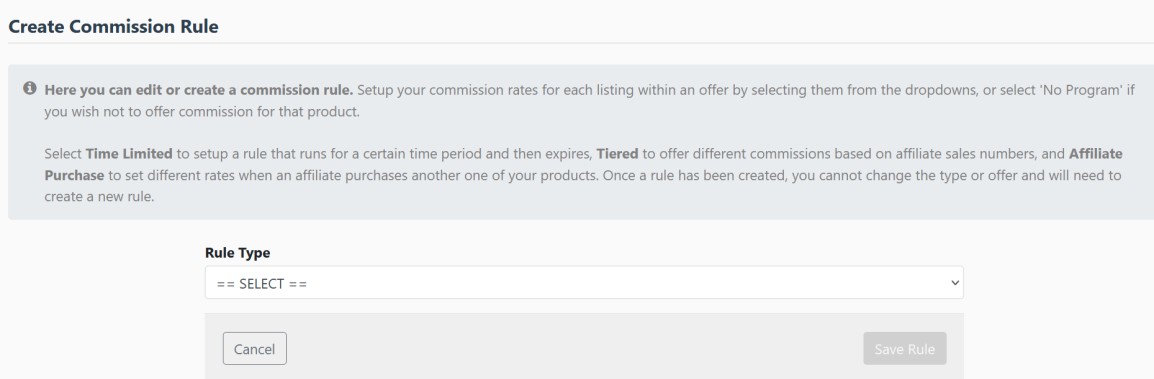
Choose the Time Limited option…
Study the settings in the image below…
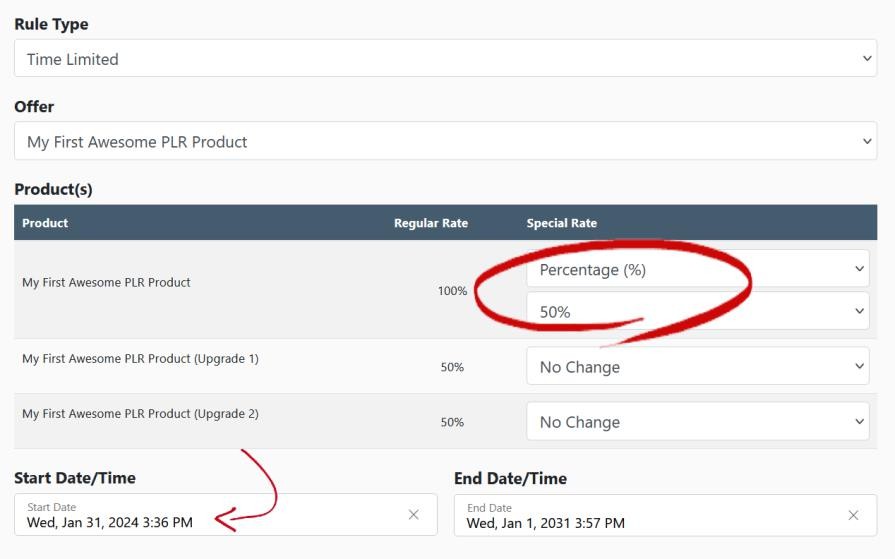
We’ve changed the commission rate for our front-end product from 100% to 50% – and set a start date for this change to occur… and an end date (in the distant future) for it to end.
On the date stipulated, affiliates will receive 50% commissions from sales instead of 100%.
This will all be handled automatically by WarriorPlus. Beautiful!
Affiliate Contest: If you’re running an affiliate contest, you’ll set it up here. This is beyond the scope of this report. It’ll be covered in a separate tutorial.
Test Purchase: This is where you’ll buy your own product to see if it all works smoothly and if you’re taken to the upsell page (for a funnel). Do note that you’ll actually be purchasing the product. So there will be a charge on your credit card bill.
This wraps up the settings part.
You’re good to go now!
You have everything you need to know to set up and sell your products in WarriorPlus.
There are just a few finer points to be aware of.
Read on…
Few Extra Points to Note!
Building sales pages
While this isn’t related to WarriorPlus, you’ll probably need a good page builder for your sales pages. There are many awesome page builders on the market, and it doesn’t really matter which one you use as long you can proficiently build sales pages with it.
We highly recommend OptimizePress as a stable and easy-to-use page builder.
Protecting your download page
If you wish to protect your download page from thieves and other nefarious characters who will wantonly share your hard work with their friends (who didn’t purchase from you) …
You can use Product Dyno to protect your access page. If you’re just using a zip file as a download, you won’t need this tool. WarriorPlus will encrypt the link for you.
But if it’s a download page with a URL on your domain that can be accessed by anyone, Product Dyno will lock down the page so that only buyers will have access to it.
Selling 2 products on 1 sales page
Many beginners have this question…
They may wish to give their buyers 2 or 3 options on the sales page (and this can apply even if it’s a funnel) …
And if they’re using affiliates, they’ll want affiliates to get credit for whichever product the buyer chooses to get on that page.
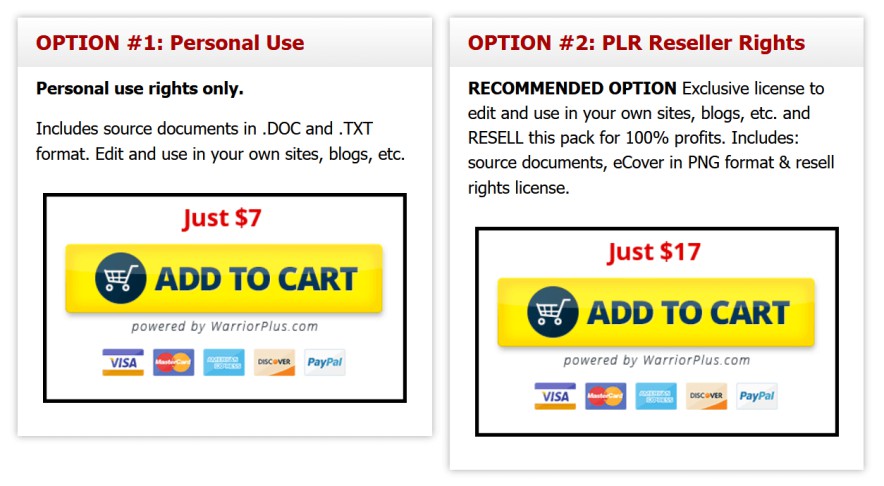
For example, in the image below, the vendor is selling 2 products on one page. One offers ‘personal use rights’ and the other offers ‘PLR reseller rights’ …
To achieve this objective, you’ll need to add 2 products in your first offer page.
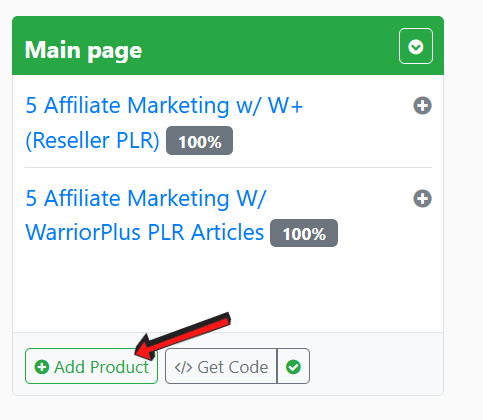
All you’ll have to do is click on the ‘Add Product’ tab and you can add another product.
It goes without saying that you’ll need to create a product listing first for it to show up in the offers dropdown list.
Since both products are on one offer page, the affiliates will still get credit no matter which product the customer buys.
As shown earlier, if you want the buy button codes, just click on ‘get code’, and you can design the buttons and get the codes here…
That’s it! We’re done and it’s time for a few closing words…
Closing Words
Congrats on making it all the way through!
While the process can seem overwhelming and even intimidating, rest assured that if you followed the process shown here step-by-step, you’ll get it all done smoothly.
If you have any issues, you can get assistance from the WarriorPlus Help Center: https://help.warriorplus.com/en/
Or you could make a post in their official Facebook group: https://www.facebook.com/groups/1953816324900664
Other than that, just know that you only need to go through the learning curve once, and when that’s done, you’ll have no problems creating products and offers in future.
This guide has left nothing out and is enough for even the greenest newbie to get started selling their own products on this versatile platform.
WarriorPlus is a one-stop solution that will process payments, build your customer list, pay affiliates, handle product delivery and more.
It’s convenient, easy to use and reliable. Sure, they take a small fee for each sale, but it’s well-worth the price for the service they provide.
You can see their fees here: https://help.warriorplus.com/en/articles/2772140- warriorplus-fee-schedule
In conclusion, there are several vendors on WarriorPlus who are making 6 and even 7 figures a year just by selling products there.
If they can do it, so can you.
Create solid products, deliver great customer service, and maintain a solid reputation
without going over to the ‘dark side’ just for easy profits…
And WarriorPlus will serve you well over and over again.
Leverage this platform and transform your online business into a seamless, rapid, and automated machine that generates a thriving online income for you.
You have the info you need. The ball is in your court, it’s your game now.
Sign up for your free WarriorPlus account and start selling today!